The post Mini Chocolate Croissants appeared first on Bubli's World Cuisine.
]]>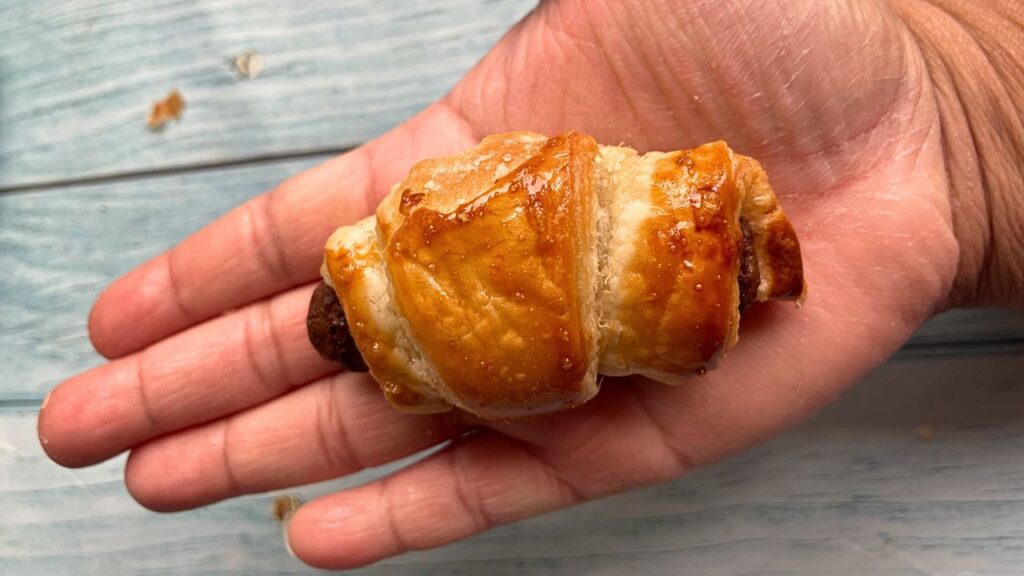
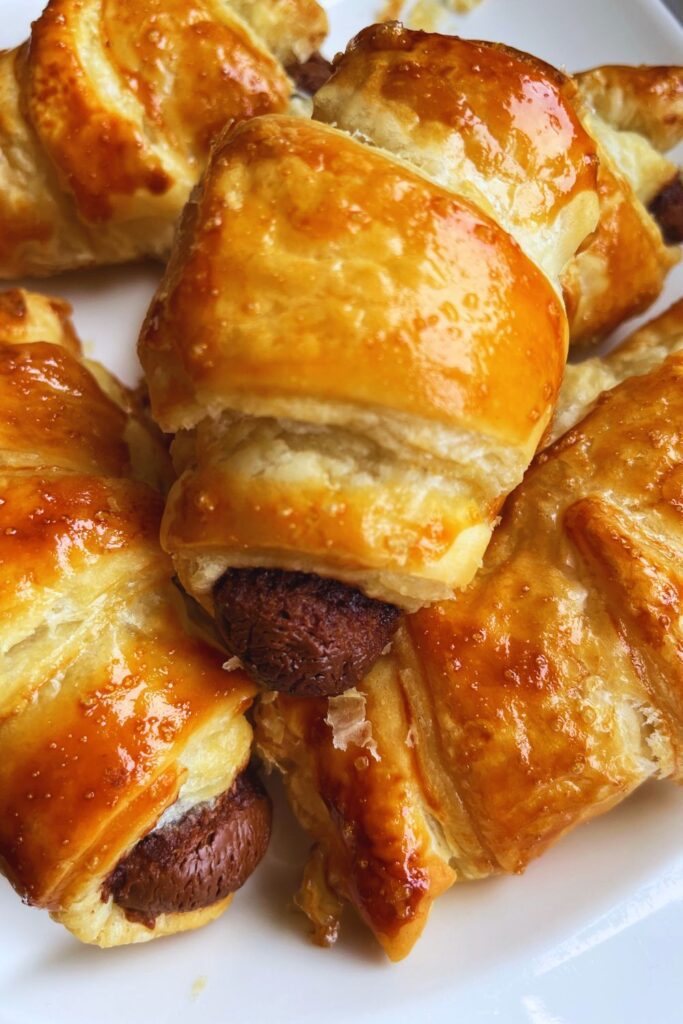
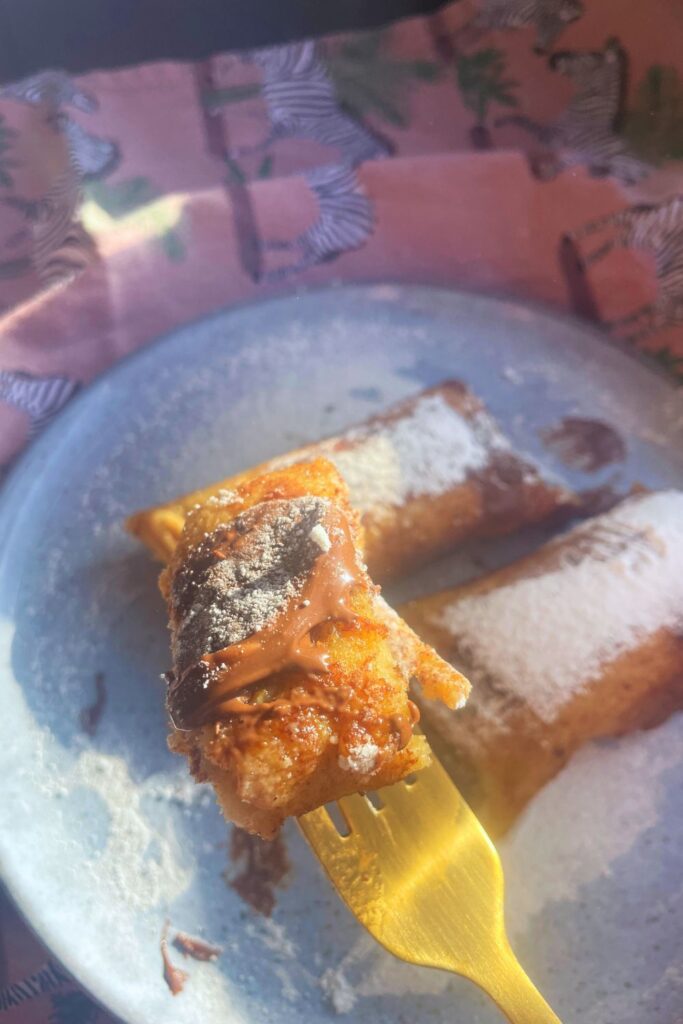
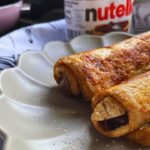
Mini Chocolate Croissants
A really simple way for making Croissants at home. These mini chocolate croissants are made using ready rolled puff pastry sheets that are easily available on all supermarkets and filled with delicious chocolate spread. Making these mini using puff pastry sheets reduces time for busy mums or anyone who wants to make tasty quick snacks on a budget.
Why I Love These Mini Chocolate Croissants
It’s super simple to make and comes together very quickly.
Makes a great lunchbox side item for both kids and grown ups.
Tasty tea time snack.
A quick and easy croissant recipe.
Budget friendly kids snack recipe.
What Makes Mini Croissants So Special
Mini croissants are simply smaller versions of the traditional buttery croissant. While they may be small in size, they pack all the flavor and flakiness of their full-sized counterparts. Here’s why they’re a must-try:
- Perfect Portion Control: Sometimes, a full-sized croissant can be a bit much, especially if you’re just looking for a light snack. Mini croissants are the perfect solution, offering just the right amount of indulgence without going overboard.
- Versatility: Whether you’re planning a brunch, hosting a party, or simply want a snack, mini croissants fit the bill. They can be sweet, savory, or even a mix of both, making them a versatile addition to any menu.
- Easy to Make: Baking mini croissants are a fun project that doesn’t require much more effort than making regular croissants. If you use store bought ready rolled puff pastry sheets they will be budget friendly too.
My other Puff recipes you might like:
Bite Sized Puff Pastry With Sprinkles
Recipe Video: Mini Chocolate Croissants Recipe
I have created a recipe video for making this quick and easy Mini chocolate croissants and have already posted the video on my YouTube channel Bubli’s World Cuisine. It’s a step by step visual demonstration on how to make this tasty bite sized snacks. To see the recipe in action from start to finish, please click on the video. And for a printable version of this recipe please check the recipe card at the end of the blog:
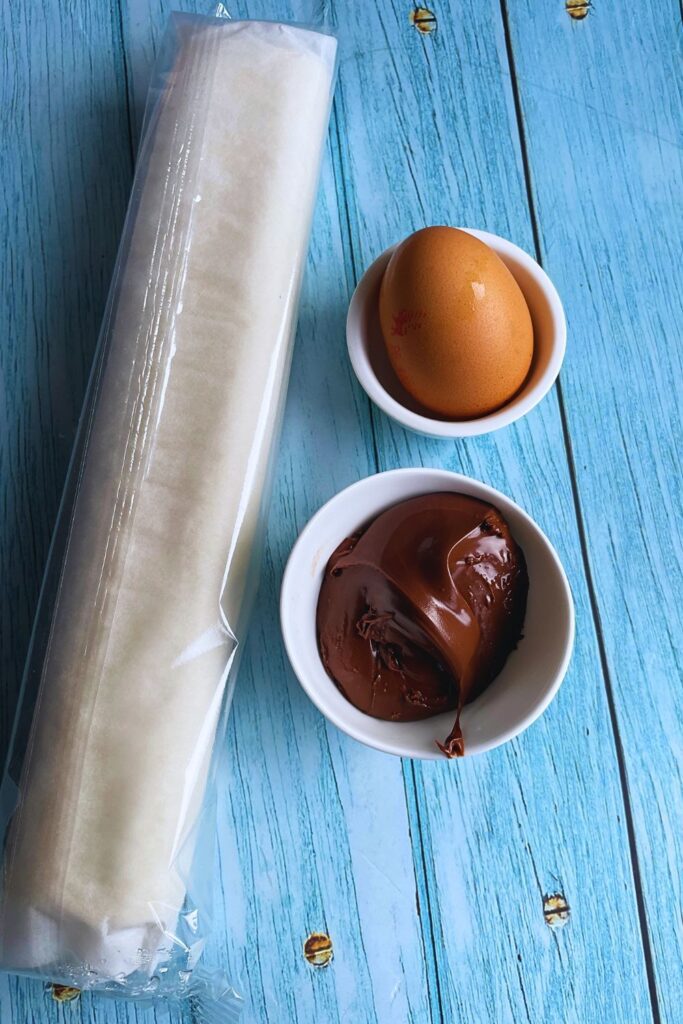
3 Ingredients Puff Pastry Mini Chocolate Croissants
Only 3 ingredients required to make this delicious chocolate croissant snack are Puff Pastry Sheet, Chocolate Spread and Egg. That’s all to make these sweet puff pastry dessert snacks.
- Puff Pastry Sheet – I like to use ready rolled puff pastry sheet for making this quick and budget friendly.
- Chocolate Spread – You can use any spread of your choice such as dairy free spread or even a nut free one.
- Egg Yolk – Only the yolk is required for the golden colour and crisp.
How To Make Mini Chocolate Croissants:
Step-by-Step Instructions For Making Puff pastry snack mini chocolate croissants
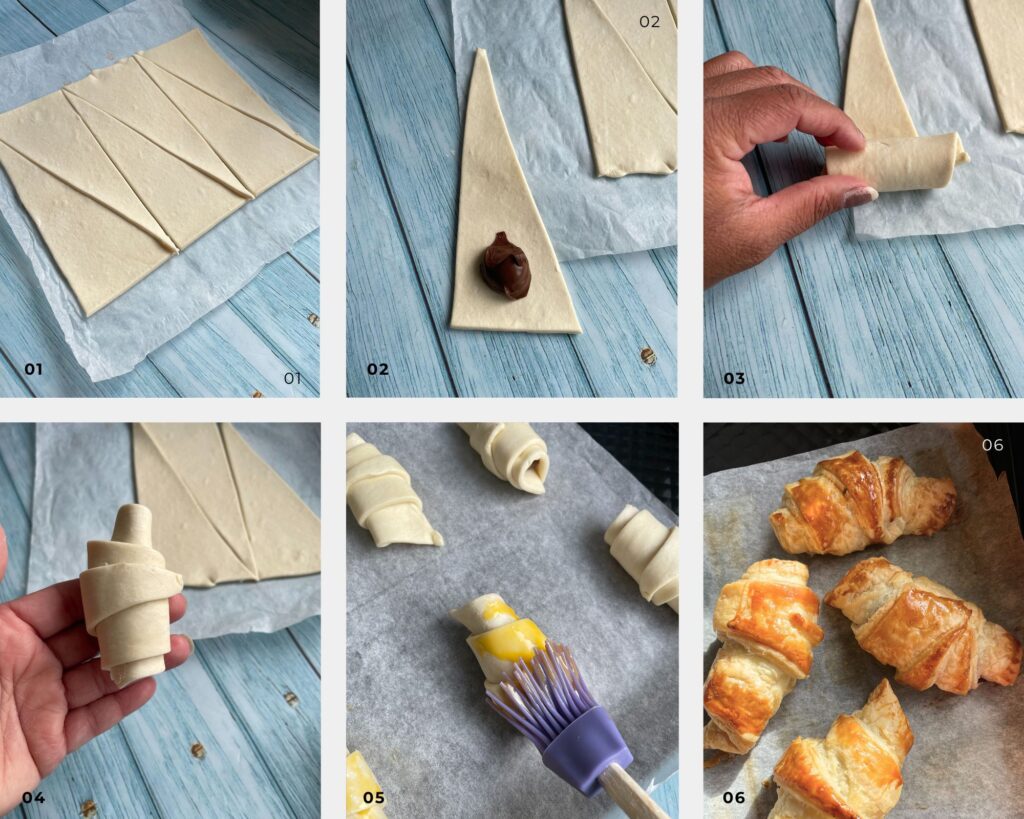
Step 1:Cut puff pastry sheet
For making mini croissants cut 1 pastry sheet into 6 strips and then cut them in triangles to make 12 portions.
Step 2: Put the filling
Put a teaspoon of chocolate spread on the lengthy side of each triangl.
Step 3: Roll
Now simply roll the croissants from the flat corner towards the pointy edge and repeat them with the rest of the croissants. Transfer them into parchment paper liner baking tray leaving some space as they will spread a little while baking.
Step 3: Apply Egg Wash
Beat an egg yolk and apply on top. This will help the croissants get golden colour and a nice crisp on top.
Step 3: Bake
Bake @ 180 C pre-heated oven for 12-15 minutes or until golden and crispy. Enjoy!
Choosing the Right Chocolate:
Chocolate is the key ingredient for making these mini Chocolate croissants and hence the type of chocolate you choose is crucial for the final taste of this snack. The better the chocolate spread or chips, the more delicious your croissants will be.
Use the same process for making plain croissants and after baking put choice of savory filling. They are also so delicious.

Mini Chocolate Croissants
Ingredients
- 1 Puff Pastry Sheet
- 4 Tbsp Chocolate Spread
- 1 Egg Yolk
Instructions
- For making mini croissants cut 1 pastry sheet into 6 strips and then cut them in triangles to make 12 portions.
- Put a teaspoon of chocolate spread on the lengthy side of each triangle.
- Now simply roll the croissants from the flat corner towards the pointy edge.
- Transfer them into parchment paper liner baking tray leaving some space as they will spread a little while baking.
- Beat an egg yolk and apply on top.
- Bake @ 180 C pre-heated oven for 12-15 minutes or until golden and crispy.
Storing Leftover Croissants
Croissants are best enjoyed freshly baked as they are crisp and delicious. If you have leftover, put them in an air tight container to store. They will need refrigeration during hot weather. Sometimes we have some leftover. Re-heat leftover croissants in the oven or air fryer for few minutes to get some crispiness.
If you’re looking something quick and easy for snack or lunchbox, make these easy and cute chocolate croissants using ready rolled puff pastry sheets and kids will be so happy. Happy baking!
Did You Make These Mini Chocolate Croissants?
Feel free to share your pics with me.
I am on Instagram @bublisworldcuisine
Follow me on Pinterest for more.
If you like this delicious mini chocolate croissants recipe, you might like my other recipes too. I would like to invite you to subscribe to my mailing list which is absolutely free. It will help you get updates on all my future posts. I post 3-4 recipes every week. Next time when I post a similar recipe or something interesting you will get notified if you are on our mailing list. Thank you for checking my blog post.
Find My Other Recipes On My Recipe Page!
Save For Yourself Or Send To A Friend
The post Mini Chocolate Croissants appeared first on Bubli's World Cuisine.
]]>The post Chocolate Mug Cake Recipe appeared first on Bubli's World Cuisine.
]]>
This is my go to recipe for having dessert no matter what time it is and what mood I am in. It’s just such a tasty and easy recipe for a delicious chocolate cake. And the best thing is it does not require much. Few pantry friendly ingredients and a microwave.
My Pinterest is always loaded with so many thank you comments since I have posted this chocolate mug cake! Every single day I would get messages from dessert lovers saying so many good things about trying out this simple delicious no fail chocolate mug cake recipe. It makes me very happy, honestly.
This is a YUMMY chocolate cake recipe for busy people, students and kids but it works for everyone!!
The Best Chocolate Mug Cake Recipe
It’s a 1 minute cake recipe!
Works amazing for busy people who loves their dessert.
You can make them Dairy free by just substituting the kind of chocolate & milk to a dairy free ones and they taste amazing.
A delicious treat for your mid night cravings.
A great recipe for beginner bakers.
Makes a quick dessert treat for kids after school or even after dinner.

Even if you have never made a cake from scratch and dare not to, do not worry this one is a no fail one and even kids can make this one because it’s that simple. It’s just mix and microwave and enjoy!
Cake In A Mug That’s Your diet Friendly
Most mug cake would call for milk. For this particular recipe, you can make some alterations according to your diet. If you are lactose intolerant, simply substitute to vegan or dairy free milk make them according to your diet. It’s also applicable for the use of chocolate. You can absolutely substitute regular chocolate to a Dairy Free one and still be able to enjoy a great fluffily tasty Mug Cake.
My other Dessert recipes you might like:
Recipe Video: 1 Minute Microwave Chocolate Mug Cake Recipe
I have created a recipe video for making this quick and easy delicious chocolate mug cake recipe and have already posted the video on my YouTube channel Bubli’s World Cuisine. It’s a step by step visual demonstration on how to make this tasty chocolate dessert in a minute. To see the recipe in action from start to finish, please click on the video. And for a printable version of this recipe please check the recipe card at the end of the blog:
1 Minute Microwave Mug Cake Ingredients List
- Flour – Regular plain flour will do the job.
- Sugar – White granulated sugar but can be substituted with brown.
- Cocoa Powder – Gives intense chocolate flavour making the mug cake rich.
- Baking Powder – Helps the mini cake become fluffy and rise.
- Oil – Makes these mug cakes light and soft.
- Milk – You can substitute with lactose free milk or plant based ones.
- Chocolate Chunks – Try to use quality chocolate for best result. You can use milk, dark or white.

How To Make Rice Chocolate Mousse:
Step-by-Step Instructions For How to make chocolate mug cake in the microwave in 1 minute:
Step 1: Mix The dry Ingredients
In a mug put Flour, Sugar, Baking powder & Cocoa powder and mix well.
Step 2: Mix In Wet Ingredients
Now add Milk & Oil and give a good mix to combine everything well.
Step 3: Add Chocolate
Now add roughly broken chocolate to the batter and push them on the batter.
Step 4: Cook In The Microwave
Place the mug in the centre of the microwave and cook for 1 minute in medium high. You might need to check at 45 seconds as every microwave oven is bit different in terms of heat.

Choosing the Right Ingredients:
Chocolate & Cocoa are the key ingredients for making this delicious fluffy Chocolate cake in a mug and hence the type of chocolate & Cocoa you choose is crucial for the desserts final taste. Opt for high-quality dark or semi-sweet chocolate and good quality cocoa for this recipe. The better the chocolate & cocoa, the more delicious your 1 minute chocolate cake will be.
Now, if you would like to make them Dairy Free, just substitute for Dairy free chocolate and you are good to go with same ration for the rest of the ingredients. And I’m sure so many people will find this recipe a very useful and tasty one for that.
I have noticed a huge difference in flavour depending on what type of cocoa and chocolate used in the baking. Try to use quality Cocoa and chocolate for best results.
1 Minute Microwave Chocolate Mug Cake Recipe
Ingredients
- 2 Tbsp Flour
- 1 Tbsp Sugar
- 1 Tbsp Cocoa Powder
- 1/4 tsp Baking Powder
- 3 Tbsp Milk
- 1 Tbsp Oil
- Chocolate Chunks
Instructions
- In a mug put Flour, Sugar, Baking powder & Cocoa powder and mix well.
- Now add Milk & Oil and give a good mix to combine everything well.
- Add roughly broken chocolate to the batter and push them on the batter.
- Place the mug in the centre of the microwave and cook for 1 minute in medium high. You might need to check at 45 seconds as every microwave oven is bit different in terms of heat.
Did You Make This Chocolate Mug Cake?
Feel free to share your pics with me.
I am on Instagram @bublisworldcuisine
Follow me on Pinterest for more.
Tips for Perfect NO FAIL 1 minute Mug Cakes
- Mix Mix Mix: To make really delicious fluffy mug cake you must make sure you have everything well combined. Stir dry ingredients well and then give a good mix after adding the wet making it the perfect batter.
- Test your microwave: Every microwave is different. Make sure you have the right temperature. You might need to keep them in the microwave for more or less seconds.
Tips for Perfect NO FAIL 1 minute Mug Cakes
I love making mug cakes. They are easy and delicious. And the best part is they are small portions – single servings which make it so much easier for me to enjoy a piece of dessert. Over the years I have experimented with mug cakes using different ingredients and flavours and many of them has come out amazing. Although this recipe for making Chocolate mug cake is my most favourite, there can be many other tasty variations.
Nutella Mug Cake – Made with dollop of delicious Nutella in the middle of the cake and come out soooo good.
Biscoff Mug Cake – Adds a twist of tasty Biscoff flavour to the cake making it different than other mug cakes cakes.
Peanut Butter Mug Cake – An absolute treat for peanut lovers. It’s a chocolate cake with Peanut butter or chips on the batter making it nutty and bit salty which balances the sweetness of the cake.
Vanilla Mug Cake – Vanilla mug cakes can me made fun by adding sprinkle to them. Adding chocolate chips can also be a tasty idea.
Cinnamon Roll Mug Cake – A lot of people loves Cinnamon flavour on their cake. These mug cakes are made with cinnamon sugar paste and cake mix and is a tasty one.
And many more!
If you’re looking to impress your friends and family with a dessert that take only a minute to bake and is tasty as well, give this 1 minute microwave Mug Cake a go and I’m sure everyone will be surprised. This recipe surely is an impressive one and the best Chocolate mug cake recipe I have ever tried. Happy Baking!
If you like this delicious quick cake in a mug recipe in the microwave recipe, you might like my other recipes too. I would like to invite you to subscribe to my mailing list which is absolutely free. It will help you get updates on all my future posts. I post 3-4 recipes every week. Next time when I post a similar recipe or something interesting you will get notified if you are on our mailing list. Thank you for checking my blog post.
FAQS
What Is Cake In A Mug
Mug cakes are cake made in a mug, they are single serving cake and usually made in the microwave. As these cakes are single serving small portions, they cook quickly and if done properly with good mixing and proper timing, you will end up having cake that are perfectly done from inside and so moist.
How do you make Cake In A Mug
Mug cake recipes calls for simple ingredients and the cakes are so rich in taste and flavour. It’s as simple as mixing all dry ingredients in a mug and adding wets to that. Good stirring to ensure everything is well combined and then a minute or so in the microwave to cook the cake. Simple.
Why do my mug cakes never work?
Mug cakes are really simple to make and a good recipe should give you fluffy tasty Mug cakes. Make sure to stir everything well. Put them one at a time in the centre of the microwave and keep an eye as every microwave is different. Also, it’s best to use a bigger mug so that they don’t flow outside and make a mess.
Are mug cakes safe to eat?
Mug cakes are absolutely safe to eat. Microwave can cook food much quicker than an traditional oven and a mug cake made in the microwave should be safe to eat even for kids.
Why don’t mug cakes use eggs?
The cooking process in a microwave is very quick. Mug cakes are small portions of cakes and can still rise perfectly without the use of eggs.
Find My Other Recipes On My Recipe Page!
Save For Yourself Or Send To A Friend
The post Chocolate Mug Cake Recipe appeared first on Bubli's World Cuisine.
]]>The post Rice Chocolate Mousse appeared first on Bubli's World Cuisine.
]]>
Why Rice Chocolate Mousse
Rice might not be the first ingredient that comes to mind when you think of mousse, but it adds an unexpected creaminess and a subtle texture that complements the rich chocolate perfectly. The rice also adds a hint of earthiness, balancing the sweetness of the chocolate and creating a well-rounded flavour profile. Plus, this dessert is gluten-free, making it an excellent option for those with dietary restrictions. Also, anyone who is lactose intolerant can enjoy this deliciously creamy dessert where rice and warm water will create a creamy blend along with dairy free chocolate to give you the mousse you were missing out.
Why You’ll Love This Rice Chocolate Mousse Recipe
It’s super simple to make and comes together very quickly.
This recipe for making Rice chocolate mousse is Gluten free making it a tasty treat for anyone who cannot have gluten in their diet.
You can make them Dairy free by just substituting the kind of chocolate to a dairy free one and they taste amazing.
This mousse is Egg free and suitable for anyone who cannot have raw or cooked eggs.
The chill in the fridge very quickly compared to traditional mousse making the wait time very less.
Make this rice chocolate mousse Your diet Friendly
If you are lactose intolerant, simply substitute to vegan or dairy free chocolate and make them according to your diet. If you are watching your weight, just skip adding honey or use less honey and they will still be nice and tasty. Add finally, it’s completely Egg free which makes them amazing for anyone who cannot have eggs raw or cooked.
My other recipes you might like:
Air Fryer Tandoori Chicken Recipe
Recipe Video: Egg Free Rice Chocolate Mousse Recipe
I have created a recipe video for making this quick and easy Rice Chocolate mousse and have already posted the video on my YouTube channel Bubli’s World Cuisine. It’s a step by step visual demonstration on how to make this delicious egg free, gluten free chocolate dessert. To see the recipe in action from start to finish, please click on the video. And for a printable version of this recipe please check the recipe card at the end of the blog:
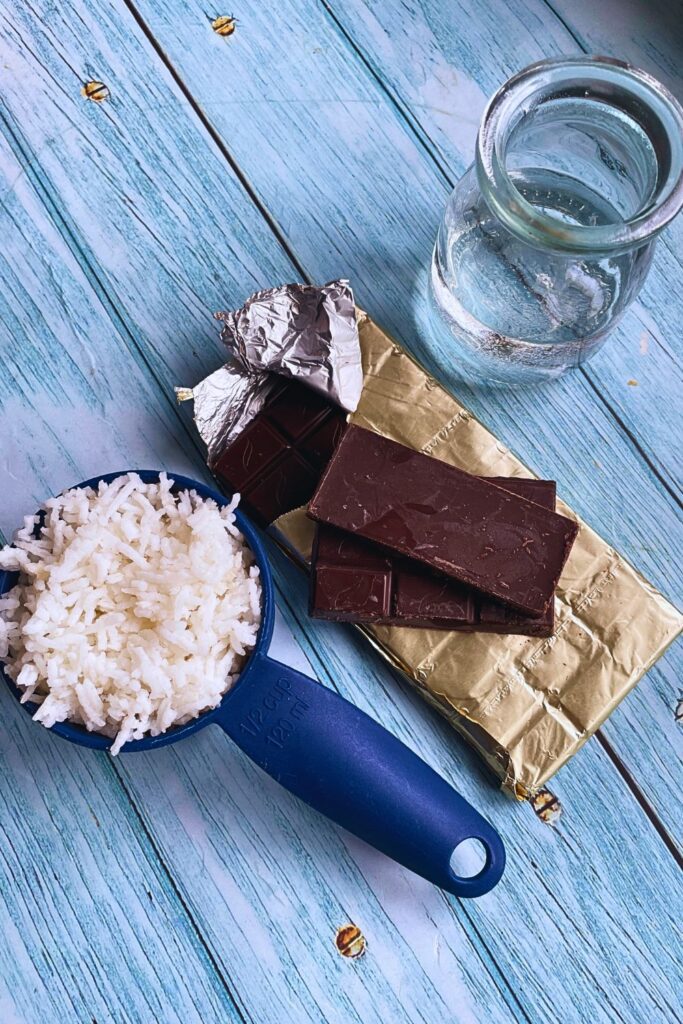
4 Ingredients Rice Chocolate Mousse
Only 4 ingredients required to make this healthy Gluten free and Egg Free creamy chocolate dessert for kids and grown ups.
- Rice – Regular cooked rice but not the sticky type.
- Chocolate – Try to use quality chocolate for best taste and make sure to use at least 50% cocoa ones.
- Water – Plain warm water.
- Honey – Honey is used as a natural sweetener for this tasty dessert treat but you can skip if you like.
How To Make Rice Chocolate Mousse:
Step-by-Step Instructions For Making Rice Chocolate Mousse
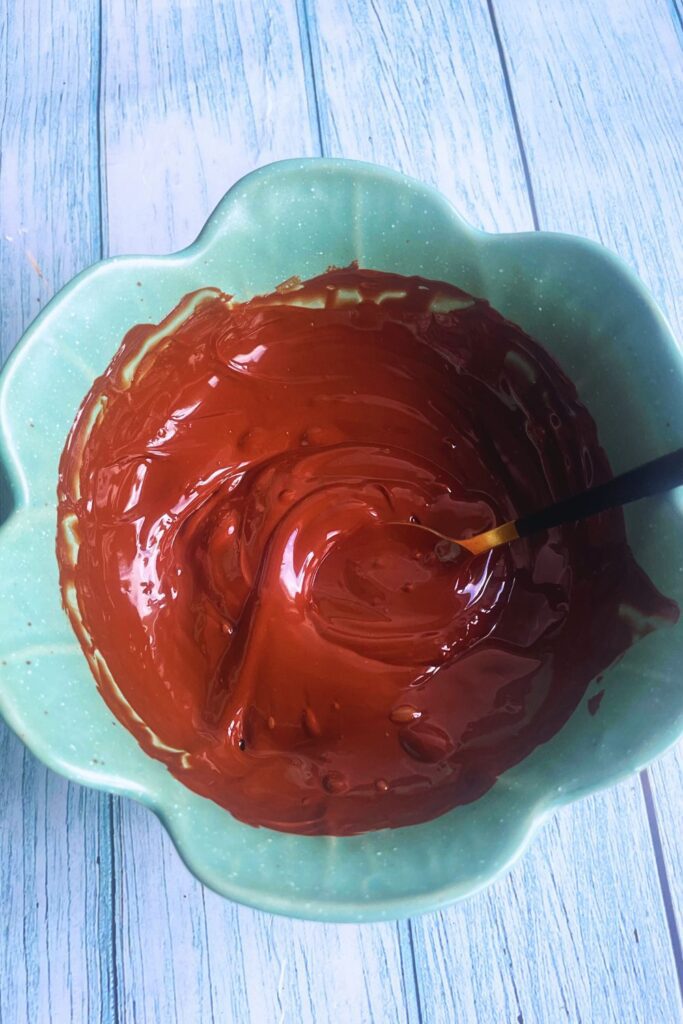
Step 1: Melt the Chocolate
Melt Chocolate. You can use a double boiler or just melt them using your microwave. I use a microwave as it’s much faster and easier.
Step 2: Blend Everything
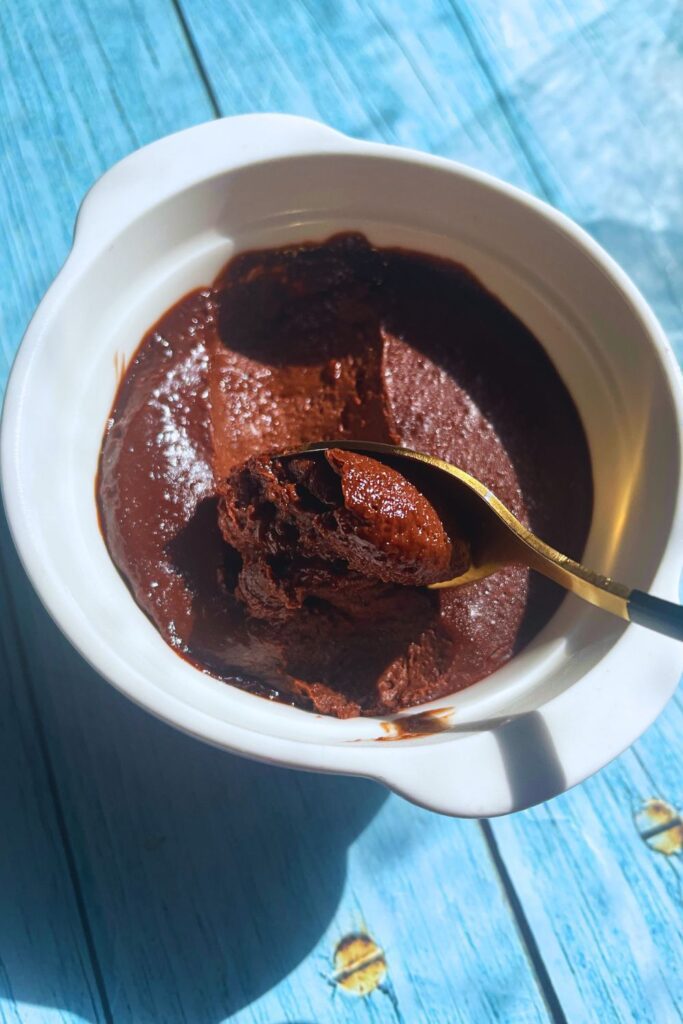
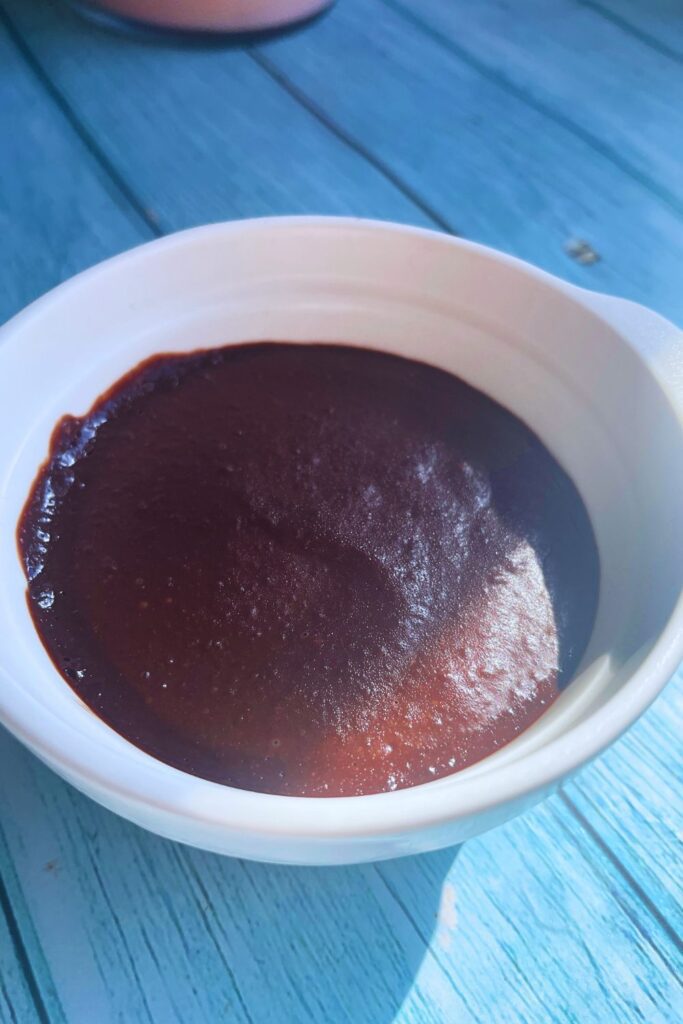
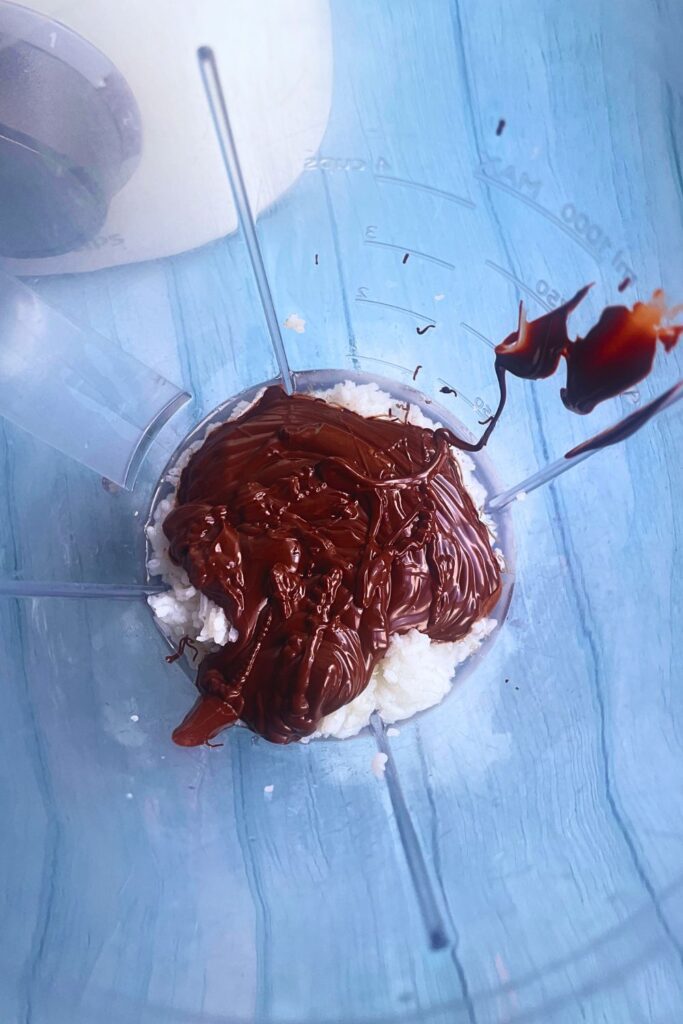
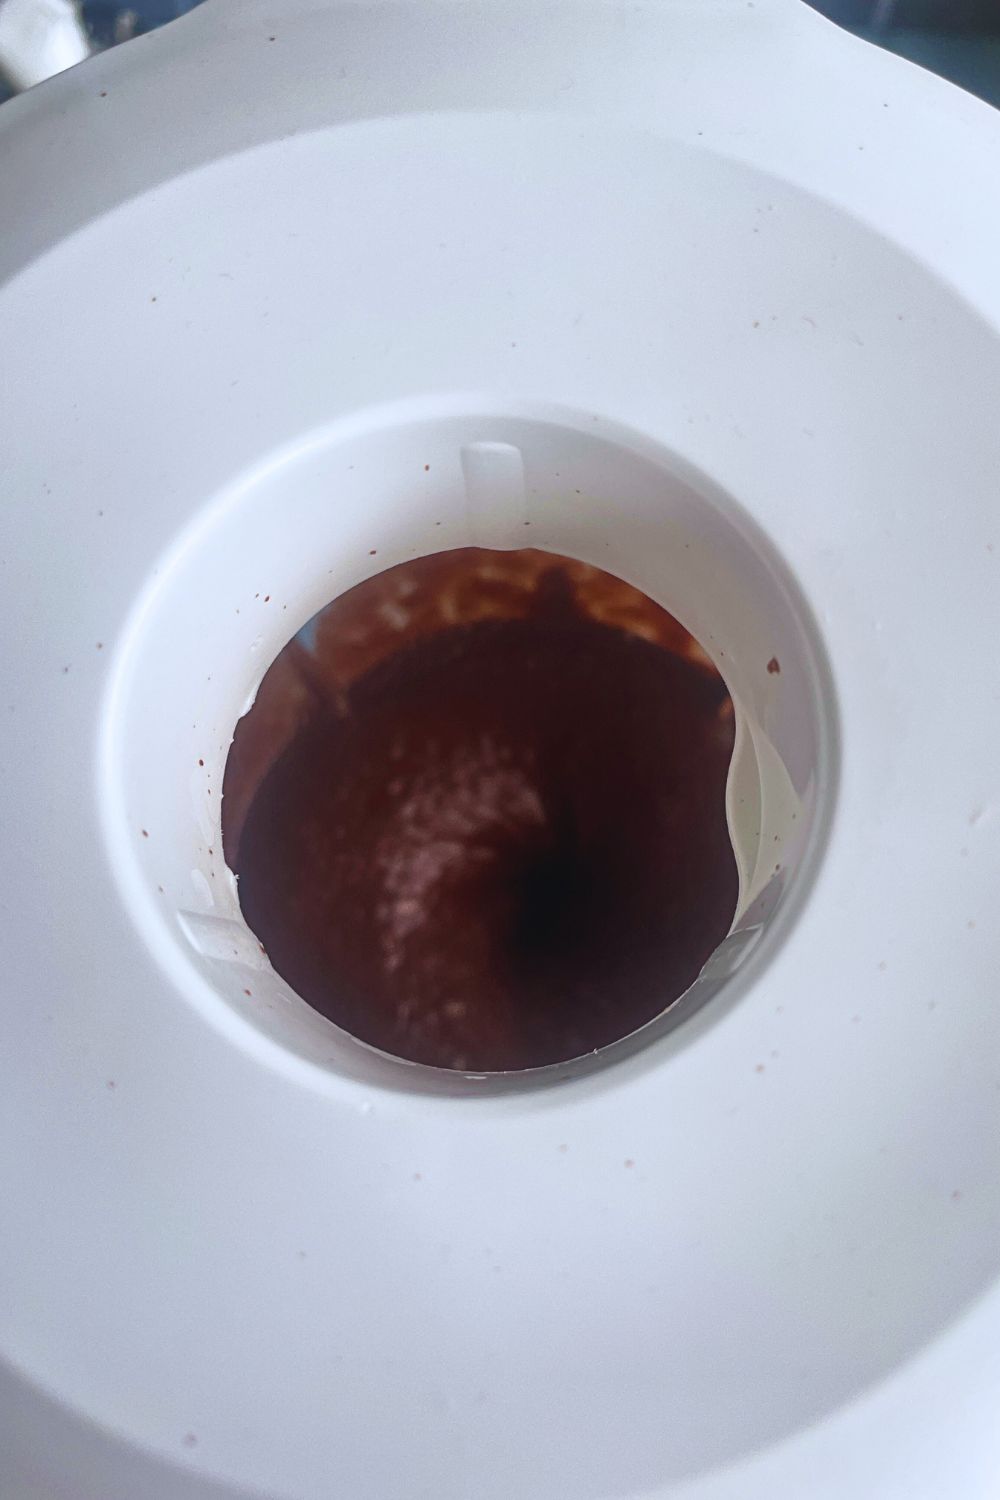
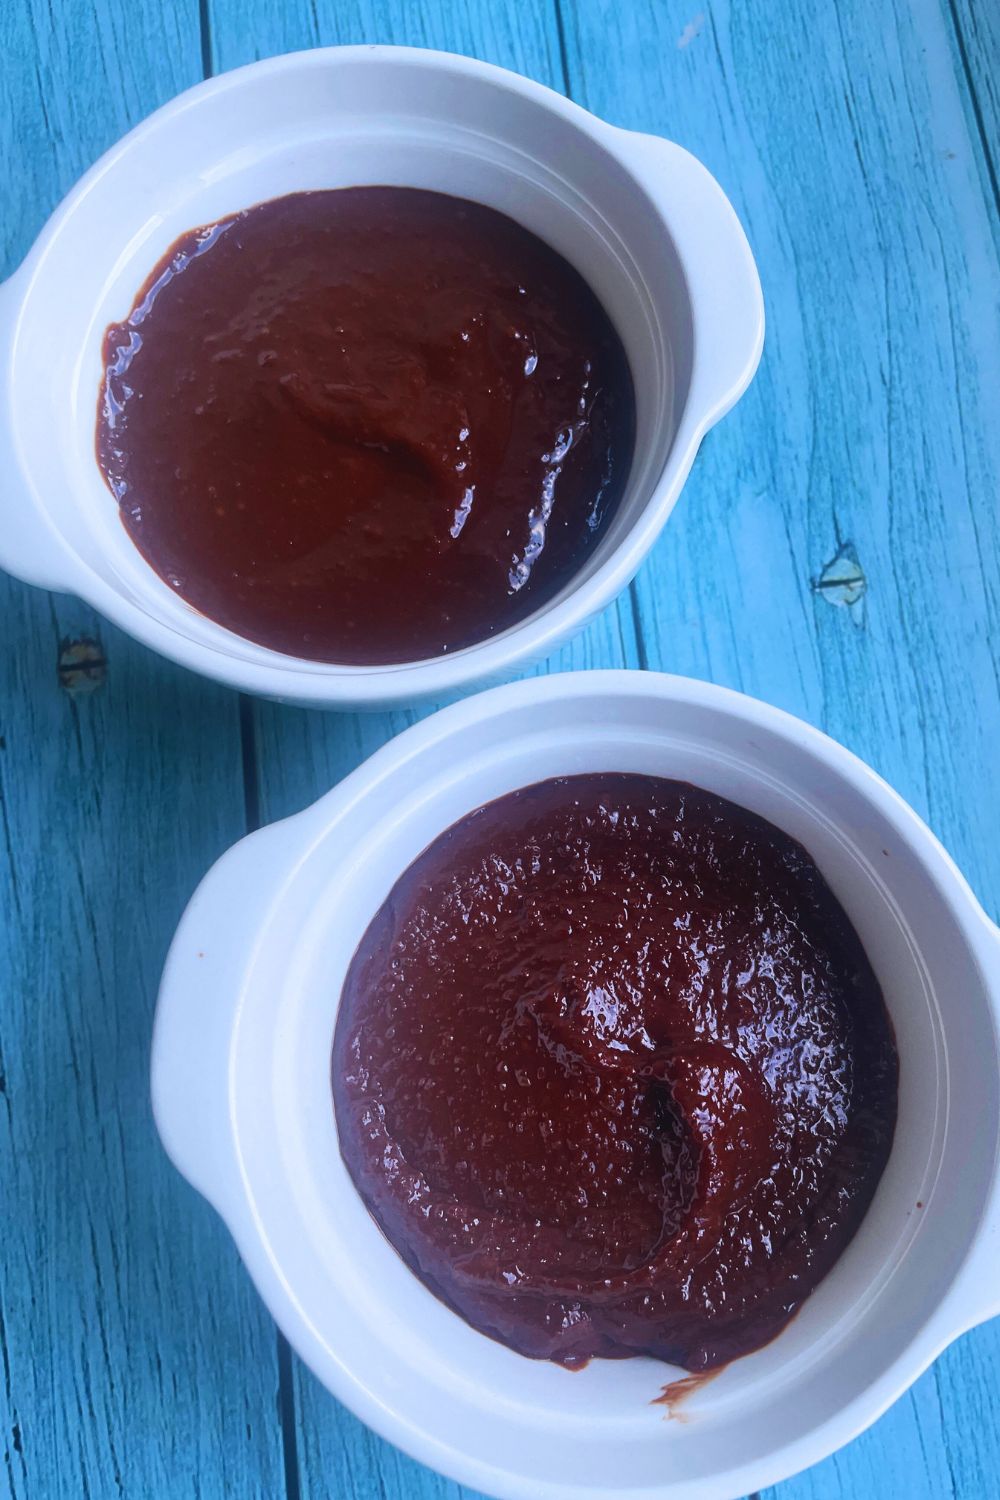
Put everything in the blender jug for making a delicious blend of mousse. Rice, Warm water, Chocolate and Honey – all goes in the blender and depending on the speed of your blender, blend until you get creamy consistency. Once you are happy with the outcome, pour them in dishes.
Step 3: Chill the Mousse
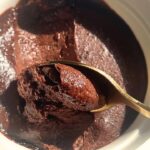
Now that all easy things are done, the hard part starts which is chilling the mousse and waiting for it to be ready. The good news is that it settles very quickly. Just pop the dish or small dishes in the frisge for 2-3 hours and they will be ready to enjoy.
Choosing the Right Chocolate:
Chocolate is the key ingredient for making Chocolate mousse and hence the type of chocolate you choose is crucial for the desserts final taste. Opt for high-quality dark or semi-sweet chocolate with at least 50% cocoa for this recipe. The better the chocolate, the more delicious your mousse will be. Avoid using chocolate chips, as they contain stabilizers that can affect the melting process.
Now, if you would like to make them Dairy Free, just substitute for Dairy free chocolate and you are good to go with same ration for the rest of the ingredients. And I’m sure so many people will find this recipe a very useful and tasty one for that.
I would love to hear which brand of Dairy free chocolate you have used to make this delicious Dairy free Rice Chocolate mousse.
Rice Chocolate Mousse
Ingredients
- 1/2 Cup Rice
- 3/4 Cup Chocolate 50% Cocoa
- 1/4 Cup Water Might need 1-2 Tbsp extra
- 2 Tbsp Honey Optional
Instructions
- Melt Chocolate using a double boiler or just melt them using your microwave.
- Put everything in the blender jug and blend until you get creamy consistency.
- Pour in dish and chill in the refrigerator for 2-3 hours and serve.
Storing Leftover Rice Chocolate Mousse
These mousse are really delicious and finishes very quickly. However, there could be leftover or you may want to make them in advance and proper storage ensures your chocolate mousse stays fresh and delicious.
Refrigerate:
To store these Rice mousse in the refrigerator, cover them with plastic wrap or place them in an airtight container, They stay fresh in the fridge for up to 3 days. Ensure that the mousse is well covered to prevent it from absorbing any odors from other foods in the refrigerator.
Tips for Perfect Rice Chocolate Mousse:
- Rice: To make really delicious and non grainy Rice chocolate Mousse, make sure to use slightly warm rice. You can use leftover rice but make sure they have not gone hard.
- Use High-Quality Chocolate: The quality of the chocolate you use will directly affect the flavor of your mousse. Opt-in for a high-quality dark chocolate with a cocoa content of at least 50% for the best results. If you want to make them Dairy free, just substitute to Dairy free chocolate.
- Adjust Sweetness to Taste: Depending on your preference and the type of chocolate you use, you may want to adjust the amount of sweetness used. Taste the mixture before chilling and add more honey if needed.
If you’re looking to impress your friends and family with a dessert that’s both delicious and unusual, amazing for people with different diet restrictions, give this Rice chocolate mousse a go and I’m sure everyone will be surprised. Its unique texture and rich chocolate flavor make it a standout treat that will leave everyone asking for the recipe. Give it a try, and you’ll discover a new favorite dessert that’s sure to become a staple in your kitchen. Happy cooking!
If you like this delicious creamy Rice chocolate mousse recipe, you might like my other recipes too. I would like to invite you to subscribe to my mailing list which is absolutely free. It will help you get updates on all my future posts. I post 3-4 recipes every week. Next time when I post a similar recipe or something interesting you will get notified if you are on our mailing list. Thank you for checking my blog post.
Find My Other Recipes On My Recipe Page!
Save For Yourself Or Send To A Friend
The post Rice Chocolate Mousse appeared first on Bubli's World Cuisine.
]]>The post Chocolate Coated Raspberry Bites appeared first on Bubli's World Cuisine.
]]>
Chocolate Coated Raspberry Bites
Chocolate coated raspberry bites – Rich, velvety chocolate and the tart sweetness of fresh raspberries. Chocolate covered raspberry bites are a simple yet decadent treat that you can easily make at home. Whether you’re looking for a quick dessert to impress guests, a sweet snack for yourself, or a homemade gift for loved ones, these little bites of joy are sure to please.
Why You’ll Love This Recipe
Made With Healthy Ingredients: All ingredients used in this recipe are healthy and are beneficial for the body. You can enjoy them guilt free knowing it’s a healthy bite.
Simple Ingredients: The recipe calls for ingredients that are easily available in supermarkets and corner shops.
Perfect for kids and grown ups: I love snacks that are appropriate for everyone in the household. When it comes to snacking, nothing beats healthy snacks that have nutritious ingredients and both kids and grown ups can enjoy together.
Make it Your diet Friendly
If you are lactose intolerant, simply substitute to vegan or dairy free chocolate and make them according to your diet. If you are watching your weight, just add less honey and they will still be nice and tasty. Add nuts if you are not allergic to and make them extra delicious and healthy.

My other Delicious recipes you might like:
Party Appetisers With Raspberry & Cream Cheese
Recipe Video: Chocolate Coated Raspberry Bites
I have created a recipe video for making this quick and easy Chocolate coated raspberry bites and have already posted the video on my YouTube channel Bubli’s World Cuisine. It’s a step by step visual demonstration on how to make this delicious chocolate-raspberry bites at home for everyone. To see the recipe in action from start to finish, please click on the video. And for a printable version of this recipe please check the recipe card at the end of the blog:
4 Ingredients Chocolate-Raspberry Bites
Only 4 ingredients required to make this healthy gluten free snacks for kids and grown ups.
- Raspberries – Always use fresh Raspberries for this recipe. Try to use good quality ones as raspberries are the key ingredients for this simple treat.
- Honey – Honey is used as a natural sweetener for this tasty dessert treat.
- Chia Seeds – Adds crunch to the chocolate coated raspberry bites.
- Chocolate – Try to use quality chocolate for best taste and you can use milk, dark or white chocolate.

How To Make Chocolate Coated Raspberry Bites:
Step 1: Line a Tray With Parchment paper.
Step 2: In a plate mash fresh raspberries. Add Chia seeds and honey and mix together.


Step 3: Take a spoonful of mixture and place on the parchment paper. Gently level the top.
Step 4: Freeze the disks for an hour.


Step 5: Melt choice of chocolate in the microwave.
Step 6: Dip chocolate disks in melted chocolate and place in the parchment paper to solidify.

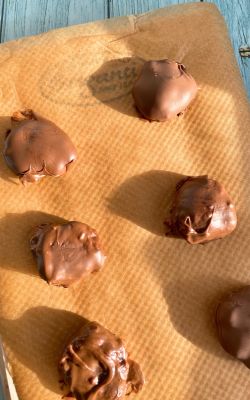

Chocolate Cover Raspberry Bites
Ingredients
- 12 Raspberries
- 1 tsp Chia Seeds
- 1 Tbsp Honey
- 50 g Chocolate
Instructions
- In a plate mash fresh raspberries. Add Chia seeds and honey and mix together.
- Take a spoonful of mixture and place on the parchment paper. Gently level the top.
- Freeze the disks for an hour.
- Melt choice of chocolate in the microwave.
- Dip chocolate disks in melted chocolate and place in the parchment paper to solidify.
Tips for Perfect Chocolate Covered Raspberry Bites:
Choose Fresh Raspberries: The quality of the raspberries makes a big difference. Choose firm, ripe raspberries for the best results.
Use High-Quality Chocolate: Good quality chocolate melts better and tastes superior. If possible, opt for couverture chocolate, which has a higher cocoa butter content.
Patience is Key: Let the raspberries dry completely and allow enough time for the chocolate to set properly to avoid any mess.
Experiment with Flavors: Don’t hesitate to get creative. You can add a hint of sea salt, a touch of cinnamon, or even a splash of liqueur to the melted chocolate for unique flavor twists.
FAQ
Can I Use vegan chocolate?
Off course, just use good quality vegan chocolate for coating the raspberries and enjoy.
If you like this delicious easy chocolate coated raspberry snack recipe, you might like my other recipes too. I would like to invite you to subscribe to my mailing list which is absolutely free. It will help you get updates on all my future posts. I post 3-4 recipes every week. Next time when I post a similar recipe or something interesting you will get notified if you are on our mailing list. Thank you for checking my blog post.
Find My Other Recipes On My Recipe Page!
Save For Yourself Or Send To A Friend
The post Chocolate Coated Raspberry Bites appeared first on Bubli's World Cuisine.
]]>The post Halloween Special Nutella Monster Donuts appeared first on Bubli's World Cuisine.
]]>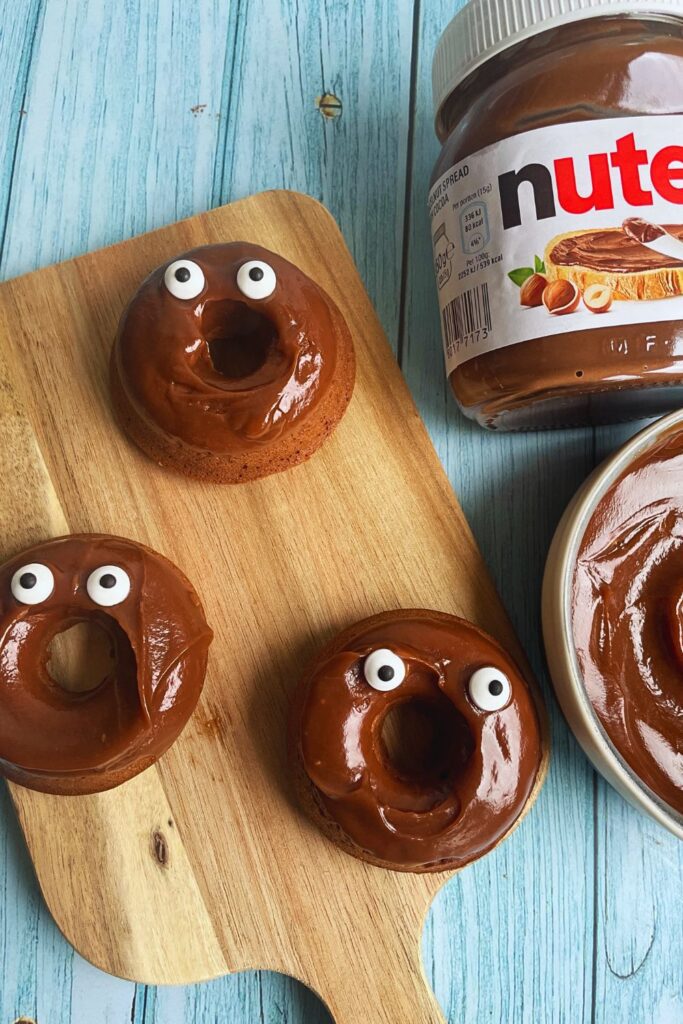
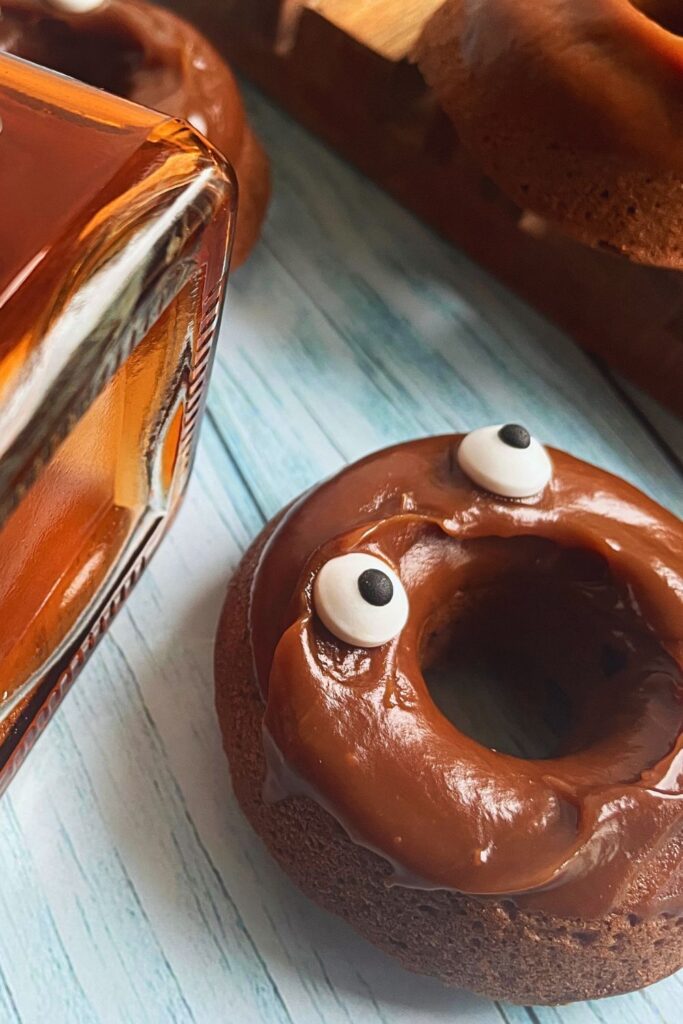
Halloween Special Nutella Monster Donuts
Halloween isn’t just about costumes and candy; it’s also a time to get creative in the kitchen! From creepy appetizers to ghastly desserts, sky is the limit for bringing out creativity in a spooky and fun way. This Halloween special Nutella monster donuts will make an amazing eye catching spooky food item any party. Even making the for kids at home will bring a smile on their face. To top that, its a 3 ingredients easy batter and the chocolate glaze is very easy to make and so yummy!
Why You will love this Nutella Baked Donuts recipe
- It’s does not require deep frying which give you a better dessert option.
- Only three ingredients required.
- Perfect for busy mums to make them for kids quicky.
- No need to be by the side of stove to turn the donuts from side to side.
- Minimal work and less cleaning.

Halloween Monster Donuts
Halloween is that time of the year when i try to get creative with fun food ideas. I know many people look for new and creative ideas to bring laughter and fun to their regular gatherings and parties. This simple technique for making spooky scary monster donuts is just another way for making everyone have a laugh at Halloween party.
My other Fun Food recipe Ideas you might like:
Halloween Snacks Witches Broomstick
Halloween Treat Marshmallow Brains
Recipe Video: Halloween Food Idea Nutella Monster Donuts
I have created a recipe video for making this three ingredients easy baked donuts and have already posted the video on my YouTube channel Bubli’s World Cuisine. It’s a step by step visual demonstration on how to make this spooky Halloween themed baked chocolate glazed monster donuts at home for a fun Halloween party. To see the recipe in action from start to finish, please click on the video. And for a printable version of this recipe please check the recipe card at the end of the blog:
Why I Prefer Baked Doughnuts to Fried Doughnuts?
Great for weight watchers: The classic way of making donuts are always deep frying them, but these are baked doughnuts, which means they are not fried in deep oil and has a lot less calories than the classic ones.
Super simple recipe: Unlike classic fried donuts, you don’t need to kneed this dough. In fact it’s a one bowl mixing of three ingredients which actually comes together in less than five minutes time.
They are time savers: Frying doughnuts in oils takes a lot of time. Moreover, you need to be precise with cooking them perfectly from all sides. Whereas these Nutella baked doughnuts are baked in the oven, so you just put your batter in the pan and the all cook at the same time while you can get done with your other chores.
Tastes great: These Doughnuts are super delicious. kids just love them.
Makes such a quick snack: These are easy to make, and they make perfect snack that you can make ahead of time and store in a box for later.
Halloween Food Ideas – Monster Donuts
So you fancy throwing a Halloween party and want to make spooky food, make this easy Halloween dessert for your Halloween party and make everyone laugh. This surely will be an eye catching one at the food table. Specially kids will go crazy for a delicious bite.
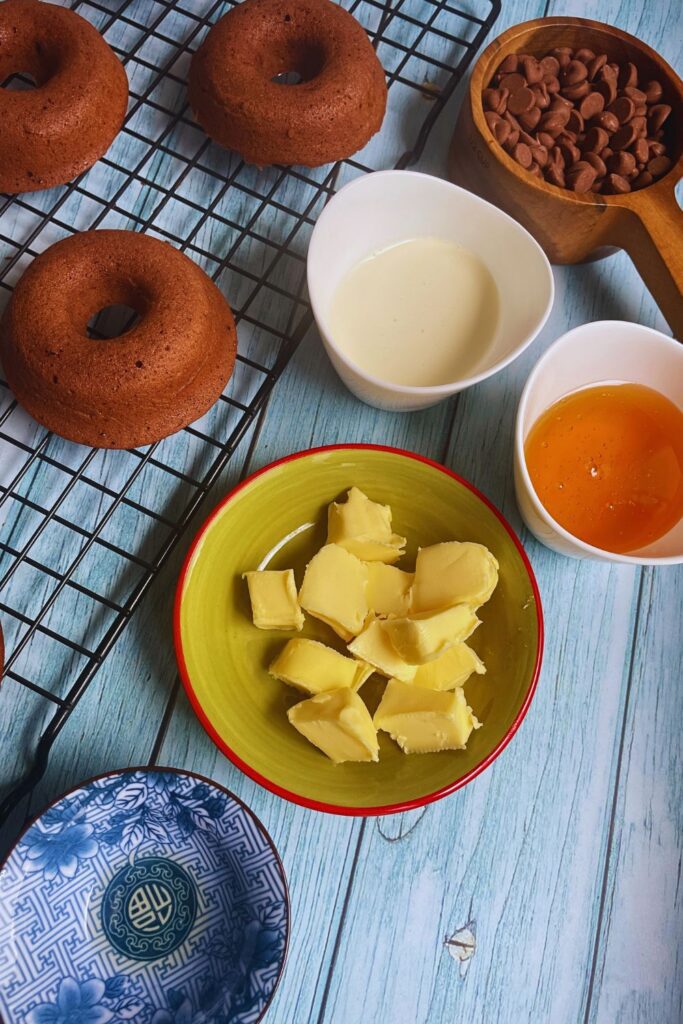
To make this delicious baked Halloween monster donuts with Nutella glaze, you’ll need the following ingredients:
- Eggs: Use large eggs for the recipe. It’s important to have eggs at room temperature.
- Nutella: Nutella is one for the key ingredients in this recipe making it extra chocolatey and nutty.
- Flour: Simple all purpose flour is used in the recipe.
- Chocolate Chips: I have used milk chocolate chip for the glaze but you may also use dark chocolate.
- Butter: Make sure to use unsalted butter.
- Double Cream: Just a little bit of double cream fluffs up the glaze.
- Honey: Honey makes the glaze shiny and more tasty.
- Vanilla Extract: Try to use quality Vanilla extract. It does make a good difference.
- Googly Eyes: To make eyes for the spooky Monster donuts.
Please Scroll down below to recipe box for measurements.
Steps to Prepare Air Fryer Grill Chicken:
- Preheat your oven to 350° F 176° C.
- Brush some melted butter on your doughnut baking pan.
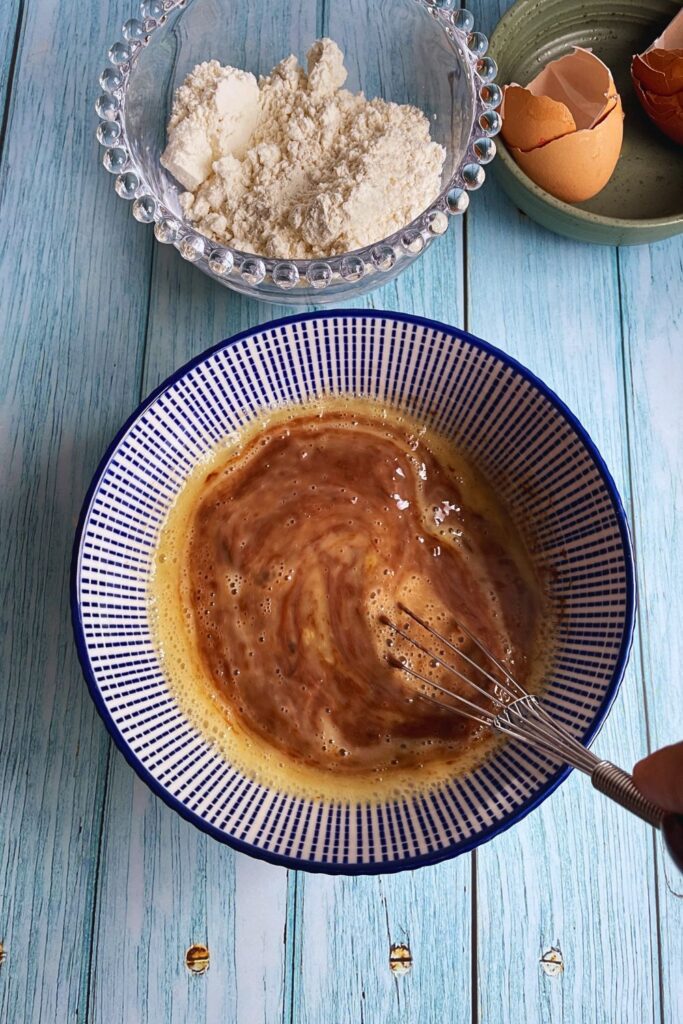
- In a bowl, crack, two eggs and lightly beat them.
- Next add Nutella to eggs and mix it well using a whisk.
- Now add flour to the mixture and fold it to incorporate.
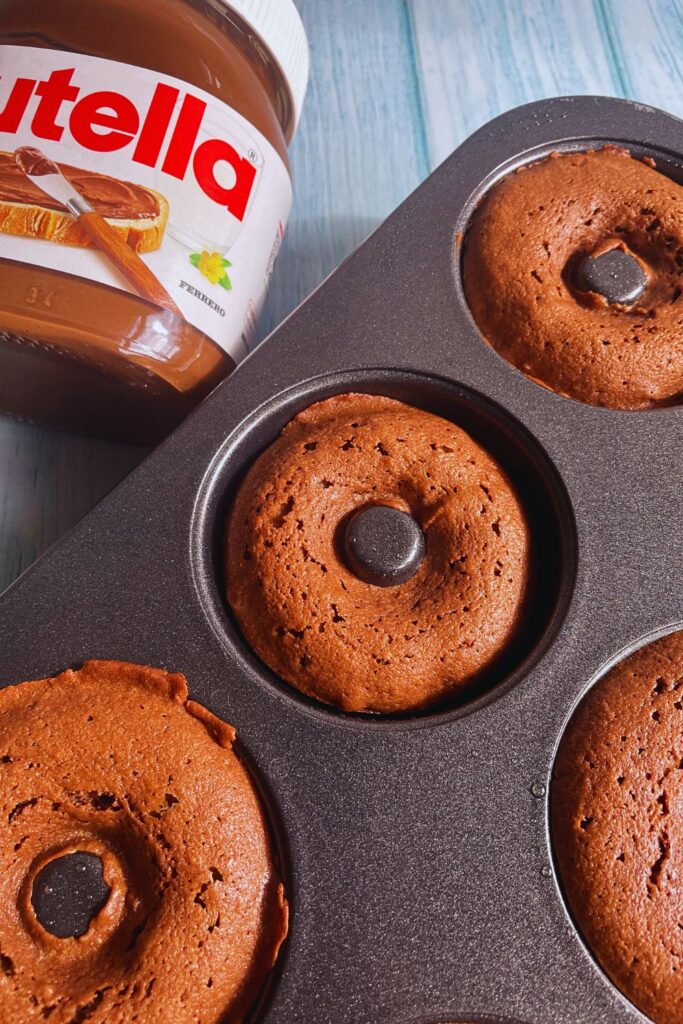
- It’s time to put the battery in a piping bag and got a small hole on the front. For better into a baking tray and fill up to 2/3 of each hole.
- Now bake for 15 minutes and then let it cool down for five minutes.
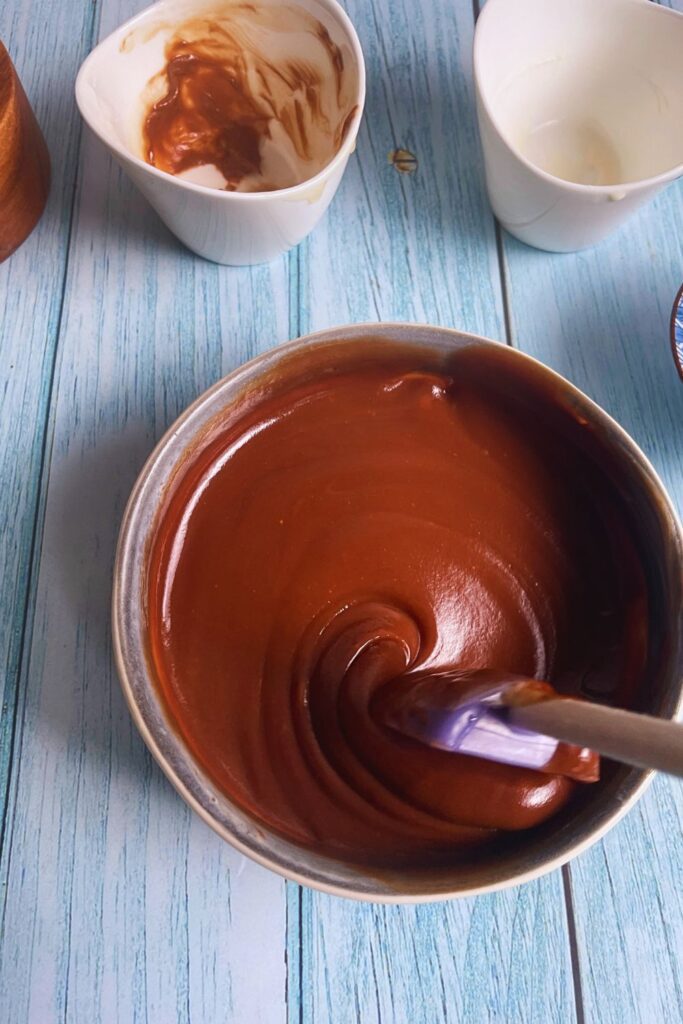
- For the glaze, take chocolate chips and butter in a bowl and microwave it for 50 seconds in two intervals.
- Add honey, double cream and vanilla essence to eat and stir well to a creamy mixture.
- Now dip each donut in delicious chocolate glaze and put on a sheet or plate.
- Carefully place googly eye on them to turn them into spooky Halloween treats.
How to Store Leftover Doughnuts:
The good news is that you can make these donuts ahead of time, and you can keep them fresh for up to 4 days in an airtight container. Besides you can even pop them in the freezer. They will keep fresh for up to three months. Just make sure you properly thaw them before consumption.

Halloween Special Nutella Monster Donuts
Ingredients
Baked Donuts Recipe
- 2 Eggs
- 2/3 Cup Nutella
- 2/3 Cups Flour
Nutella Glaze
- 1/2 Cup Chocolate Chips
- 2 Tbsp Unsalted Butter
- 2 Tbsp Double Cream
- 2 tsp Honey
- 1/2 tsp Vanilla Extract
Instructions
Nutella Baked Donuts
- Preheat your oven to 350° F 176° C.
- Brush some melted butter on your doughnut baking pan.
- In a bowl, crack, two eggs and lightly beat them.
- Add Nutella to eggs and mix it well using a whisk.
- Add flour to the mixture and fold it to incorporate.
- Put batter into doughnut pan holes 2/3 and Bake for 15 minutes and then let it cool down for five minutes.
Donut Glaze
- Take chocolate chips and butter in a bowl and microwave it for 50 seconds in two intervals.
- Add honey, double cream and vanilla essence to eat and stir well to a creamy mixture.
- Dip each donut into glaze and then put googly eyes for monster eye decoration.
Halloween is a time for ghouls, goblins, and of course, delicious treats! This year, why not ditch the boring candy corn and whip up a batch of monstrously fun donuts? These adorable and easy-to-make donuts are perfect for a Halloween party or a spooky breakfast surprise.
FAQ
Does baked donuts taste same as fried donuts?
No, Baked donuts are bit different in taste and texture to fried donuts. The frying process imparts a rich, fluffy and slightly oily flavor that is characteristic of traditional donuts. Baked donuts have a more straightforward flavor profile, often tasting more like a muffin or cake.
If you like this spooky tasty Halloween dessert idea, you might like my other recipes too. I would like to invite you to subscribe to my mailing list which is absolutely free. It will help you get updates on all my future posts. Next time when I post a similar recipe or something interesting you will get notified if you are on our mailing list. Thank you for checking my blog post.
Find My Other Recipes On My Recipe Page!
The post Halloween Special Nutella Monster Donuts appeared first on Bubli's World Cuisine.
]]>The post Cinnamon Sugar Donut Muffins appeared first on Bubli's World Cuisine.
]]>
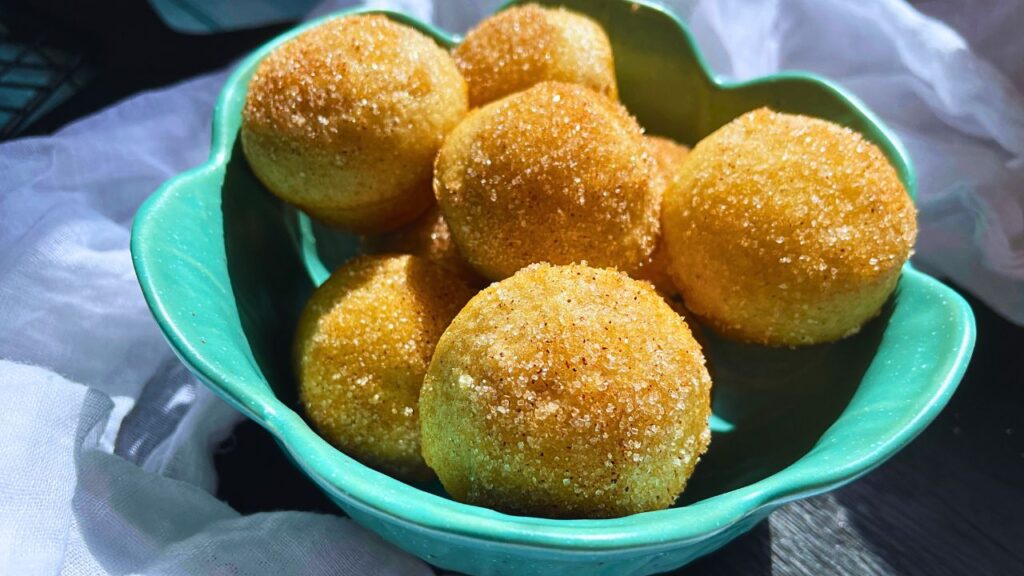
Cinnamon Sugar Donut Muffins
There’s something undeniably magical about cinnamon sugar donut muffins. These sweet, fragrant, and slightly crunchy treats have a way of bringing joy to any moment. Whether enjoyed with a steaming cup of coffee in the morning, as an afternoon snack, or as a delightful dessert, cinnamon sugar donuts have a timeless appeal that transcends age and season.
These mini muffins will finish quickly specially if served to hungry kids or at a party so make sure to make at least a full batch of 24 if making minis. Moreover, they store well and can be enjoyed later so why not make a full batch.
Key takeaways
- Not deep friend in oil which makes them a healthier donut option.
- Mini size means you can eat them in moderation.
- A tasty treat from anyone in the family.
- Works amazing as a breakfast item, in lunchbox, light snack and rewarding afterschool quick bite.
- They are light and fluffy and tastes amazing.
a Brief history of donuts
Donuts have a rich history that dates back centuries. The origins of fried dough can be traced to various cultures, but the modern donut as we know it today is often attributed to Dutch settlers in early America, who brought with them a recipe for “olykoeks” or “oil cakes.” These early donuts were simple balls of dough fried in fat, and often featured a nut or fruit center to ensure even cooking.
These donuts were similar to modern doughnuts, although they did not yet have the iconic ring shape. The common ring-shaped donut was popularized in the mid-19th century, with a legend crediting Hanson Gregory, an American ship captain, for creating the hole in the center. This innovative design allowed for more uniform cooking and transformed donuts into the beloved treat they are today.
My other delicious dessert recipes you might like:
Recipe Video: Baked Cinnamon Sugar Donut Muffins Recipe
I have created a mini recipe video for making these soft and fluffy Cinnamon sugar donuts and have already posted the video on my YouTube channel Bubli’s World Cuisine. It’s a step by step visual demonstration on how to make this tasty donut bites at home for lifting the taste of family dinner. To see the recipe in action from start to finish, please click on the video. And for a printable version of this recipe please check the recipe card at the end of the blog:
Cinnamon Sugar Donut Muffins Recipe Ingredients
You need only a handful of ingredients to make these mini baked donuts at home and they are all pantry friendly simple ingredients.
Muffin
- Melted Butter
- White Sugar
- Milk
- Flour
- Baking Powder
- Vanilla Extract
- Ground Nutmeg
Topping
- Melted Butter
- White Sugar
- Ground Cinnamon

Once you have gathered all the ingredients, follow these step-by-step instructions for making crunchy top cinnamon sugar baked donut muffins:
- In a bowl whisk together melted butter and sugar to combine.
- Add warm milk and vanilla and give a mix.
- Now it’s time to add dry to the mix and give it a good mixing until it’s lump free.
- Spray a 24 hole mini muffin tray.
- Pour batter into each hole filling up to 2/3 full.
- Bake in 375 F 190 C oven for 10 minutes or until the sides start to come off the pan.
- Let the donuts muffins cool down slightly and then transfer them into a cooling rack.
- Brush lightly with some melted butter.
- In a small bowl combine white sugar and cinnamon powder and roll the muffin tops on that.
That’s it! You just made some delicious soft and fluffy baked muffins for your family and they will love you for that.

Top Tips For Making Fluffy Cinnamon Sugar Donuts
- Pro tip: Make sure to use warm milk on butter-sugar mix.
- Pro tip: Leave the mini muffins in the baking tray to cool down for at least five minutes for easy peel off.
- Pro tip: Brush with melted butter as soon as they are out of the muffin pan but still warm.

Cinnamon sugar donuts are more than just a treat; they are a slice of comfort and nostalgia. The combination of fluffy dough and the sweet-spicy coating makes them a perennial favorite. With this simple recipe, you can bring the joy of homemade donuts into your kitchen and share them with family and friends. Happy baking!
Cinnamon Sugar Donut Muffins
Ingredients
Muffin
- 1/4 Cup Melted Butter
- 1/2 Cup White Sugar
- 1/2 Cup Milk
- 1 Cup Flour
- 1 tsp Baking Powder
- 1 tsp Vanilla Extract
- 1/2 tsp Ground Nutmeg
Cinnamon Sugar Coating
- 1 Tbsp Melted Butter
- 3 Tbsp White Granulated Sugar
- 1/4 tsp Ground Cinnamon
Instructions
Baked Muffins
- In a bowl whisk together melted butter and sugar to combine.
- Add warm milk and vanilla and give a quick mix.
- Mix baking powder and ground nutmeg to flour.
- Add dry to the mix and give it a good mixing until it’s lump free.
- Spray a 24 hole mini muffin tray.
- Pour batter into each hole filling up to 2/3 full.
- Bake in 375 F 190 C oven for 10 minutes or until the sides start to come off the pan.
- Let the donuts muffins cool down slightly and then transfer them into a cooling rack.
Crunchy Cinnamon Sugar Coating
- In a small bowl combine white sugar and cinnamon powder.
- Brush lightly with some melted butter and roll the muffin tops on that.
If you like this easy baked cinnamon sugar donut recipe, you might like my other recipes too. I would like to invite you to subscribe to my mailing list which is absolutely free. It will help you get updates on all my future posts. Next time when I post a similar recipe or something interesting you will get notified if you are on our mailing list. Thank you for checking my blog post.
FIND MY OTHER RECIPES ON MY RECIPE PAGE!
The post Cinnamon Sugar Donut Muffins appeared first on Bubli's World Cuisine.
]]>The post Biscoff Truffles appeared first on Bubli's World Cuisine.
]]>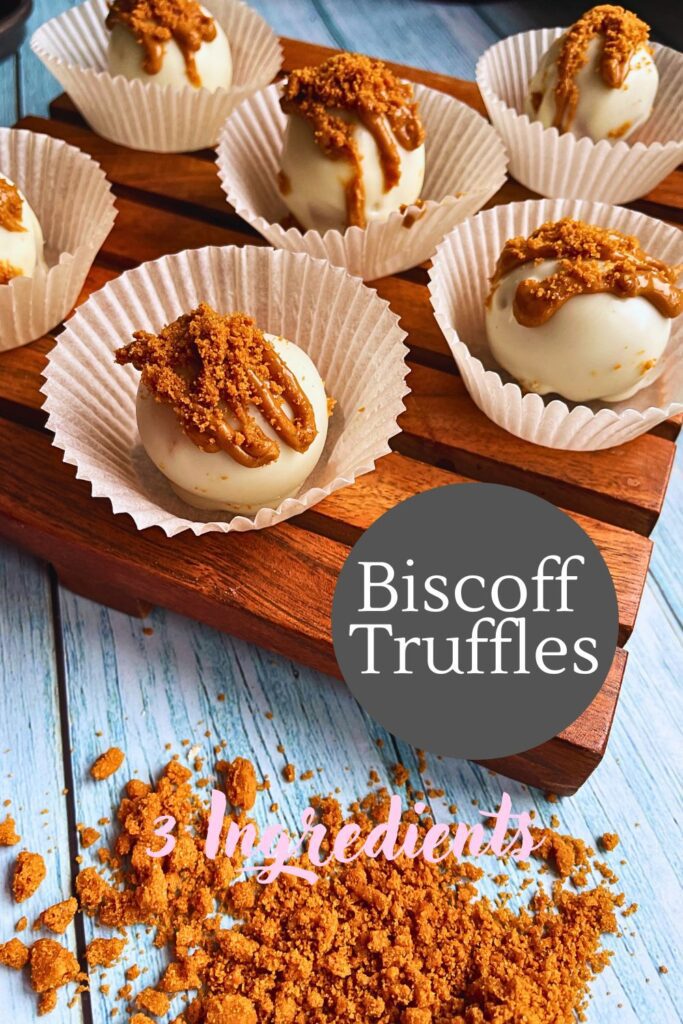
Biscoff Truffles
There’s something truly magical about Biscoff. Their caramelized sweetness and delicate crunch make them a treat on their own, but when transformed into truffles, they become an indulgent delight that’s perfect for any occasion. Whether you’re looking to impress guests at a dinner party, need a quick but decadent dessert, or simply want to treat yourself, Biscoff truffles are the way to go. In this blogpost I will share an easy recipe with only 3 ingredients to make delicious Biscoff truffles.
What is biscoff?
Biscoff is a brand name for a type of speculoos cookie, which originated in Belgium. Known for their distinctive caramel flavor and crunchy texture, Biscoff cookies have become a beloved treat around the world for it’s unique taste. Biscoff spread is also extremely popular due to it’s distinct taste. It’s like caramelized biscuit which can be enjoyed on it’s own straight from the jar and also used in many desserts to give them amazing taste.
Common Uses Of Biscoff
Snacking: Biscoff cookies are often enjoyed with a cup of coffee or tea. Their rich flavor pairs perfectly with a hot beverage, making them a popular choice for a midday snack.
Biscoff Spread: Lotus Bakeries also produces a creamy spread made from crushed Biscoff cookies. This spread has the same delicious flavor as the cookies and can be used in various ways, such as on toast, in baking, or as a dip.
Baking: Biscoff cookies are often used in baking recipes, including pie crusts, cheesecakes, and, of course, truffles. The cookies can be crushed into crumbs and incorporated into various desserts for an added layer of flavor and texture.
Dessert Toppings: Crushed Biscoff cookies make an excellent topping for ice cream, yogurt, and other desserts, adding a delightful crunch and flavor boost.
Why I LOVE Biscoff Truffles
- It’s super easy to make them in such less time.
- Makes perfect dessert gift for any party.
- They taste delicious and everyone loves them.
- Biscoff has unique taste of caramelized biscuits.
- Minimal work and less cleaning.
My other Delicious recipes you might like:
Recipe Video: No-Bake Biscoff Truffles
I have created a recipe video for making quick and easy Biscoff Truffles and have already posted the video on my YouTube channel Bubli’s World Cuisine. It’s a step by step visual demonstration on how to make this tasty easy truffles at home for family or dessert gifts. To see the recipe in action from start to finish, please click on the video. And for a printable version of this recipe please check the recipe card at the end of the blog:
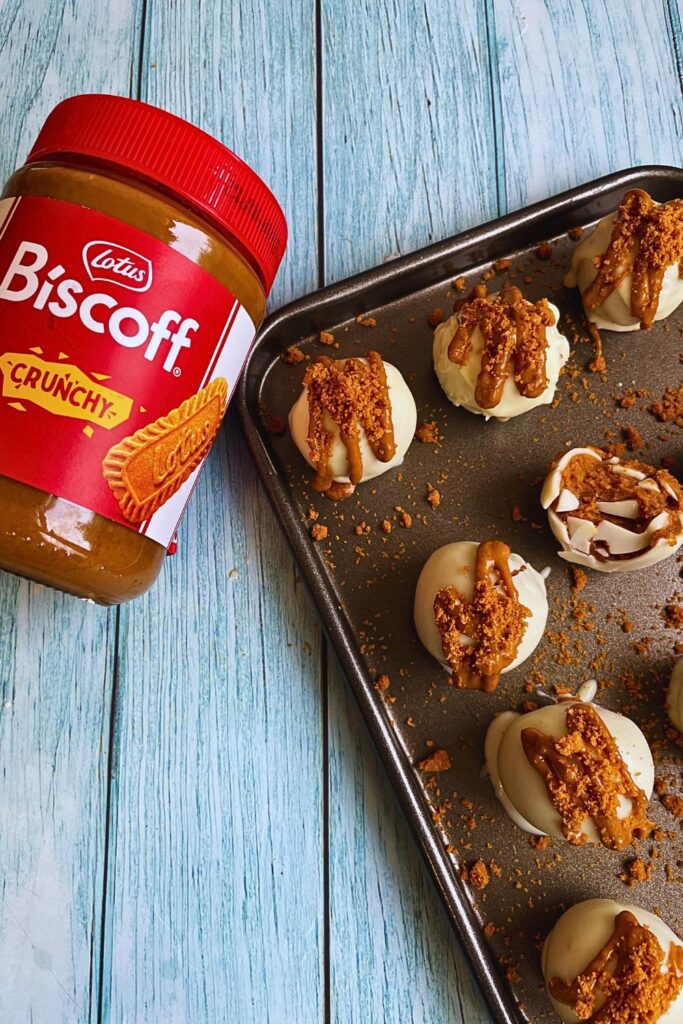
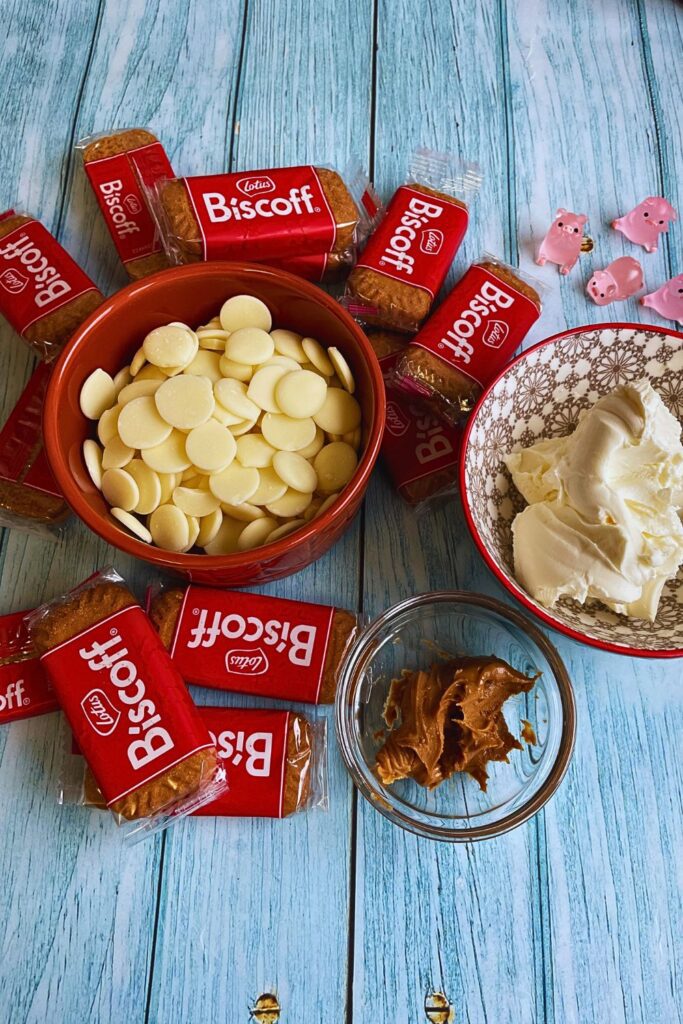
Biscoff Truffles Recipe Ingredients:
To make this delicious creamy Biscoff truffles, you’ll need the following ingredients:
- Biscoff Cookies – Biscoff cookies are key ingredients for this easy dessert recipe. Biscoff cookies are the base for this recipe and substituting that will not only compromise the taste but will take away the uniqueness of these truffles.
- Cream Cheese – Cream cheese works as a binder for these truffles. It’s just teeny tiny bit salty and tangy which also balances the sweetness of biscoff biscuits and white chocolate coating.
- White Chocolate – White chocolate makes a great pair with Biscoff biscuits but white chocolates are very sweet. So if you prefer less sweet truffles you can substitute white chocolate to dark or semi sweet milk chocolates.
- Biscoff Spread – Biscoff spread is used for decoration only and gives these delicious truffles a nice final touch.
How to make Biscoff truffles
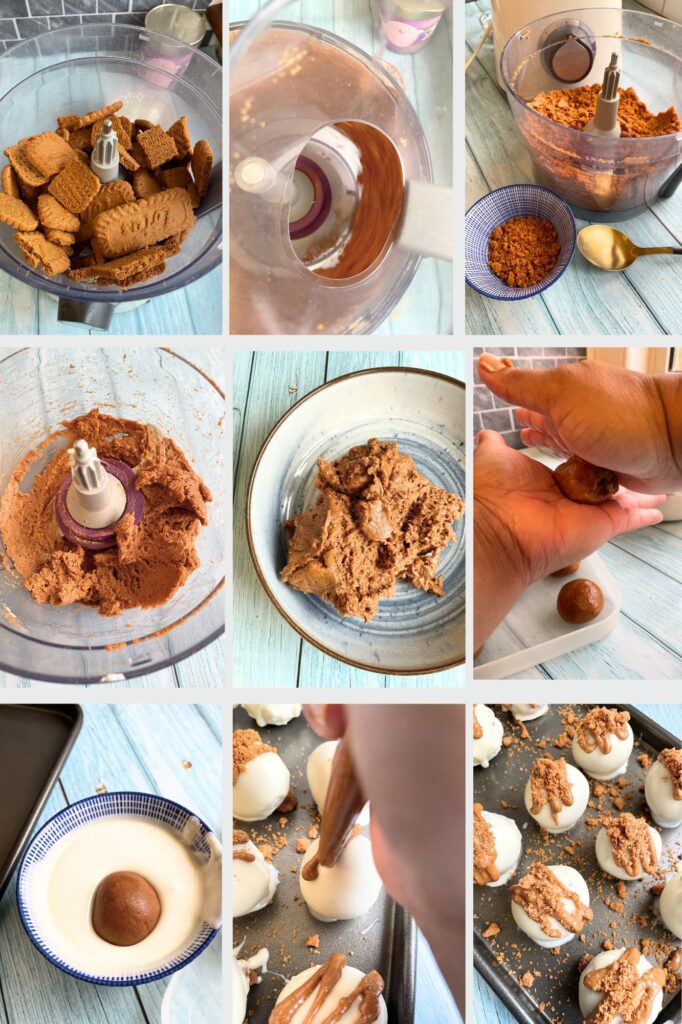
- Crush Biscoff biscuits either using rolling pin and ziplock bag or in the food processor.
- Keep 1 Tablespoon of the crushed biscuit for garnish.
- Add cream cheese to crushed biscuit and run the food processor to combine them into a creamy paste.
- Using your palms roll the delicious paste into balls. I like to use a measuring tablespoon to make equal portions.
- Refrigerate for 30 minutes to help them firm up. This will help the next step easier.
- Melt white chocolate on a bowl. You can use bar white chocolate or chocolate chips and using a microwave to do the melting is the easiest way.
- Take truffles out from the fridge and dip them in melted white chocolate to coat and place in a parchment paper for the chocolate coating to solidify.
- Once solidifies put some melted biscoff on top to garnish and finish off with some sprinkle of crushed biscoff.
Recipe Variations & Customization:
This no-bake biscoff truffle recipe is flexible! You can easily swap out or add in ingredients to create a whole new flavor of no-bake truffles that matches your personal tastes and preferences. I would love to know if you come up with new and exciting flavors. You can use the comment box to tell me about your experiments and suggestions.
Chocolate Variations: While white or milk chocolate is commonly used, you can experiment with dark chocolate for a more intense flavor and also to make the truffles less sweet.
Add-ins: Incorporate crushed nuts, dried fruit, or a splash of liqueur into the mixture for added texture and flavor.
Decorations: Drizzle with contrasting chocolate, sprinkle with sea salt, or dust with cocoa powder for a professional finish.
3 Ingredients Biscoff Truffles Recipe
Ingredients
- 250 g Lotus Biscoff biscuits
- 150 g Cream Cheese
- 150 g White Chocolate
Instructions
- Crush Biscoff biscuits in the food processor. Keep 1 Tablespoon of the crushed biscuit for garnish.
- Add cream cheese to crushed biscuit and run the food processor to combine them into a creamy paste.
- Using your palms roll the delicious paste into balls. Refrigerate for 30 minutes to help them firm up.
- Melt white chocolate on a bowl.
- Take truffles out from the fridge and dip them in melted white chocolate to coat and place in a parchment paper for the chocolate coating to solidify.
- Once solidifies put some melted biscoff on top to garnish and finish off with some sprinkle of crushed biscoff.
Biscoff truffles are a testament to how a few simple ingredients can come together to create something truly special. Whether you’re a seasoned baker or a novice in the kitchen, this recipe is approachable and delivers fantastic results every time. So, the next time you’re in the mood for something sweet, give Biscoff truffles a try—they might just become your new favorite treat!
Happy truffle making!
FAQ
What is Biscoff?
Biscoff is a brand name for a type of speculoos cookie, originally created by Lotus Bakeries in Belgium. These cookies have gained widespread popularity for their distinctive caramelized flavor, unique crunch, and versatility in various culinary applications. Let’s explore what makes Biscoff so special and beloved worldwide.
How to store biscoff truffles?
If you plan to store Biscoff truffles for later consumption, place them in an air tight container and keep refrigerated.
If you like this easy dessert recipe of no-bake Biscoff truffles, you might like my other recipes too. I would like to invite you to subscribe to my mailing list which is absolutely free. It will help you get updates on all my future posts. Next time when I post a similar recipe or something interesting you will get notified if you are on our mailing list. Thank you for checking my blog post.
Find My Other Recipes On My Recipe Page!
The post Biscoff Truffles appeared first on Bubli's World Cuisine.
]]>The post Nutella French Toast Rolls appeared first on Bubli's World Cuisine.
]]>
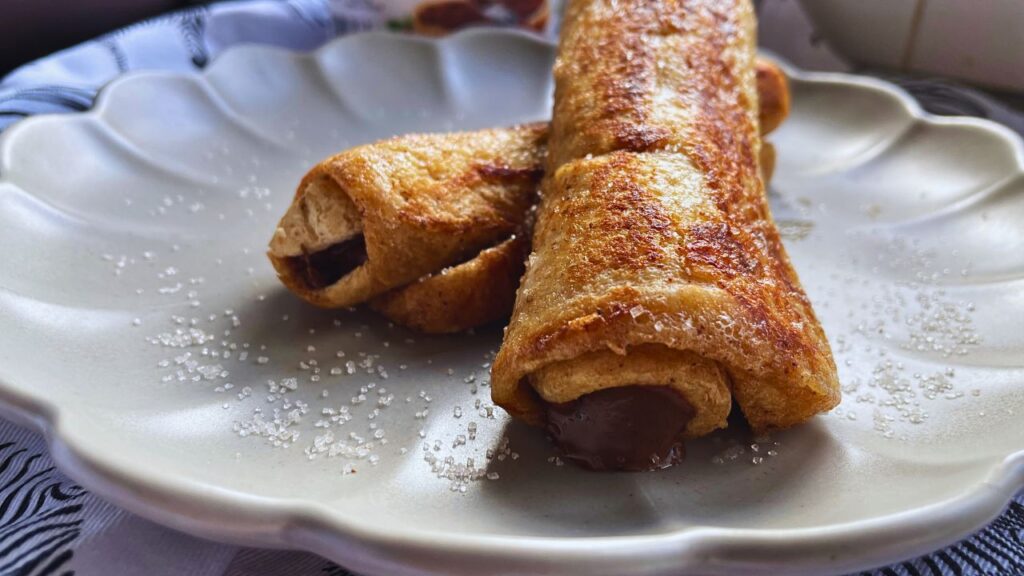
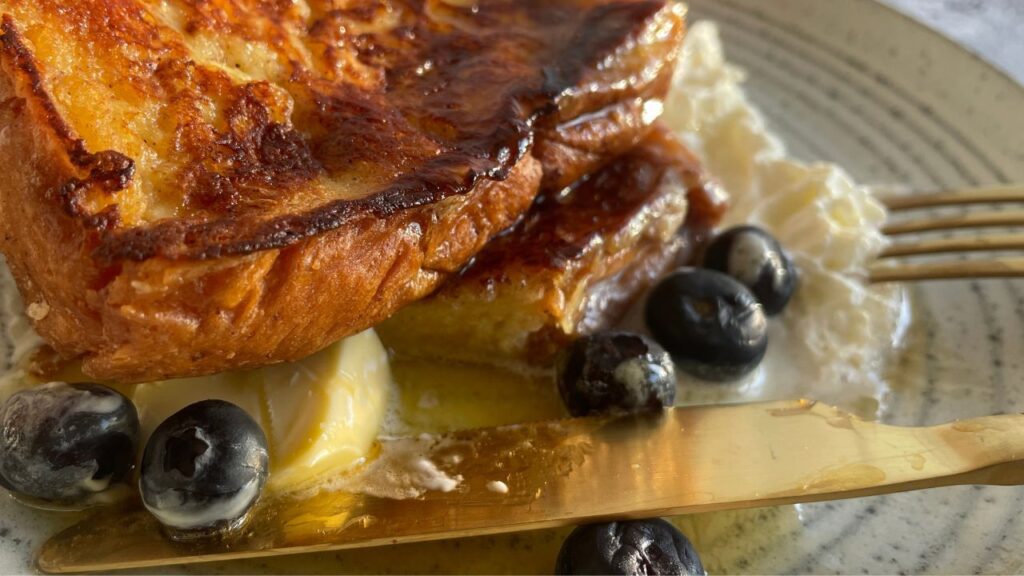
Nutella French Toast Rolls
One of the most common frustration first thing in the morning is kids do not like their regular breakfast. Breakfast is a very important meal of the day and for working parents it’s a juggle between getting ready for work, getting leftover chores done and keeping kids happy at the breakfast table before they are gone for half the day. This super easy breakfast with Nutella is so delicious that it will surely put a smile on their face with just minimum effort.
Why I LOVE Whole This Nutella French Toast Rolls Breakfast
- Delicious. This is a tasty treat in the morning. With yummy Nutella inside the French toast rolls, they are amazing start of the day.
- Super Simple Breakfast. This is an easy to make and easy to please breakfast idea that kids at home will surely give a big thumbs up to.
- Pantry Friendly Ingredients. It requires only a handful ingredients which are all pantry friendly. Moreover, if you do not have Nutella to hand, you can use other delicious chocolate spread as well.
- Make Ahead. You can make the rolls ahead of time with Nutella inside and in the morning just roll them in egg mixture and fry to serve hot.
My other Delicious Nutella Inspired recipes you might like:
Recipe Video: Nutella Stuffed French Toast Rolls
I have created a recipe video for making quick and easy Nutella French Toast Rolls and have already posted the video on my YouTube channel Bubli’s World Cuisine. It’s a step by step visual demonstration on how to make this delicious chocolatey breakfast at home . To see the recipe in action from start to finish, please click on the video. And for a printable version of this recipe please check the recipe card at the end of the blog:
Easy Breakfast With Nutella Stuffed French Toast
Nutella-stuffed French toast is more than just a breakfast; it’s an experience. The crisp outer layer gives way to a soft, custardy middle filled with warm, melted Nutella. It’s a dish that’s sure to impress family and friends and might just become your new breakfast favorite. Whether you’re celebrating a special occasion or simply treating yourself, this recipe is a surefire way to start your day with a smile.
So, next time you’re in the mood for something sweet, skip the plain old pancakes and give this Nutella-stuffed French toast a try. You won’t be disappointed!
To make this delicious chocolatey breakfast, you’ll need the following ingredients:
- Bread – For best results use thick slices of bread as they will roll better and hold the custard much better.
- Nutella – You can use any other chocolate spread of your choice.
- Egg – 1 egg is required for 3-4 rolls.
- Milk – You may also use non dairy milk.
- Maple Syrup – Used as natural sweetener. Honey or other sweetener can also be used.
- Cinnamon Powder – Enhances the flavor of the rolls but you can skip if you do not like the aroma.
- Butter – Make sure butter is unsalted.
- Powder Sugar – For garnish.
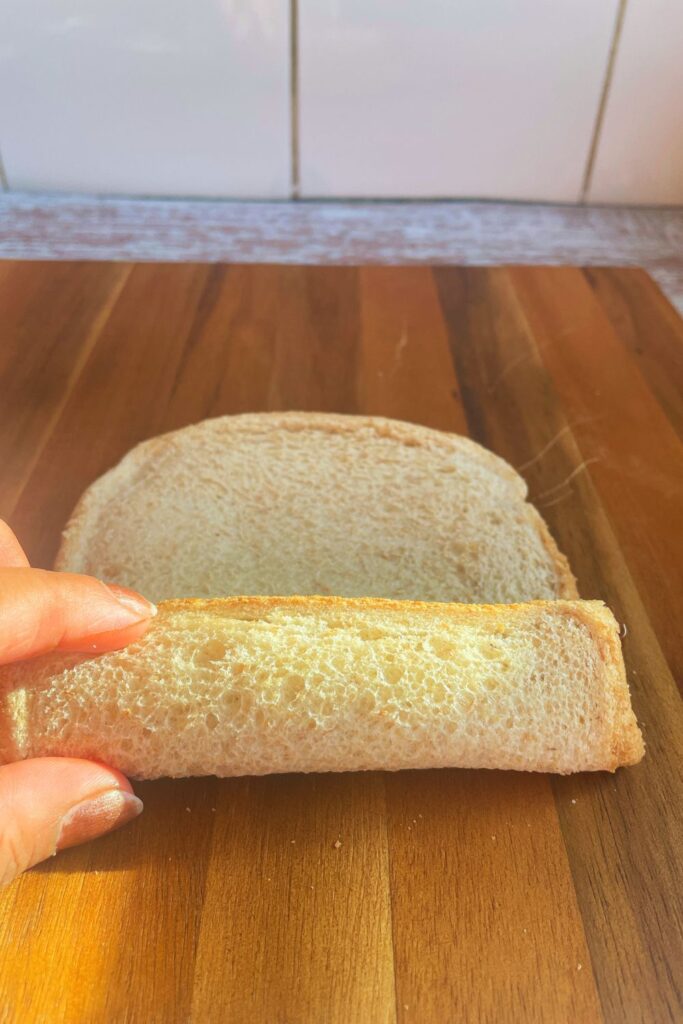
How To Make Nutella French Toast Rolls
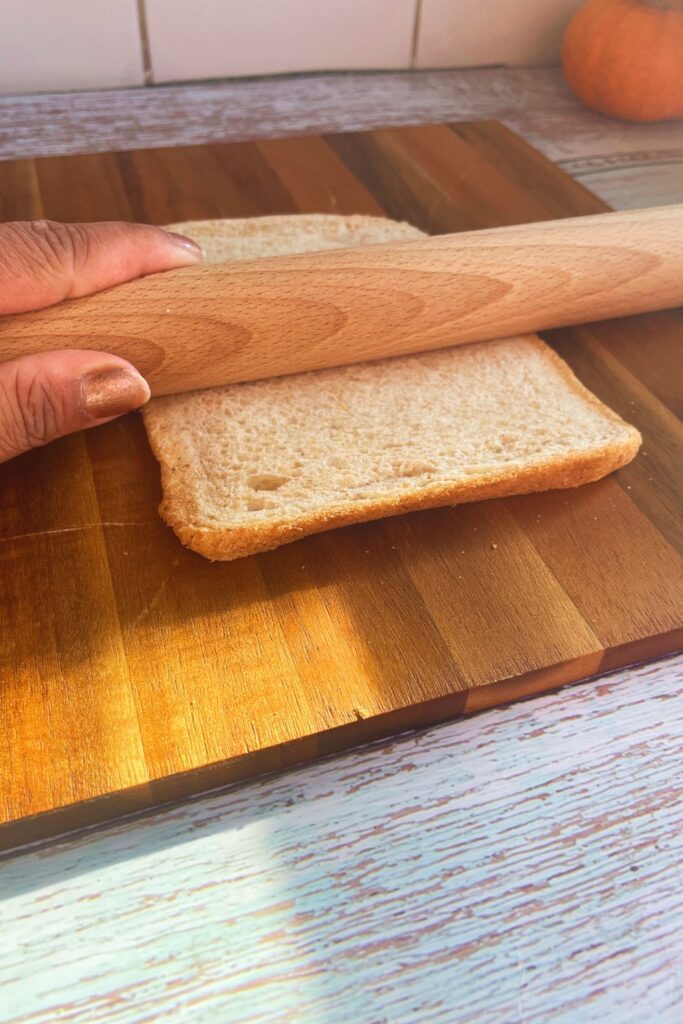
1. Prepare the Bread
Start by making the bread pieces flat by rolling them with a rolling pin.
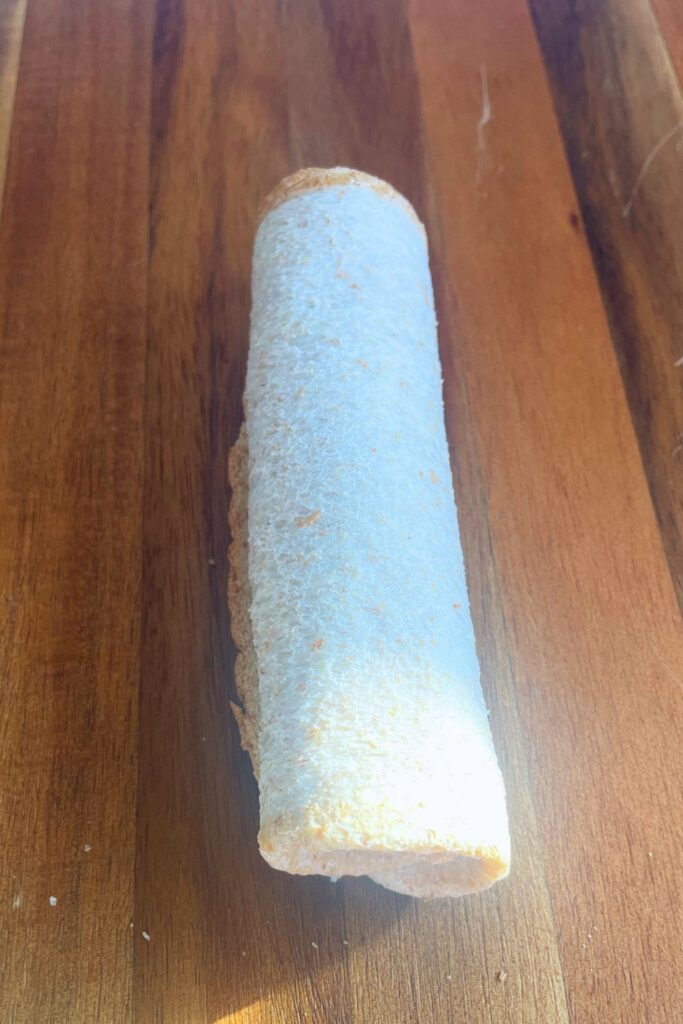
2. Fill with Nutella
Put half a tablespoon of Nutella on the corner of each bread and roll them all the way to the end.
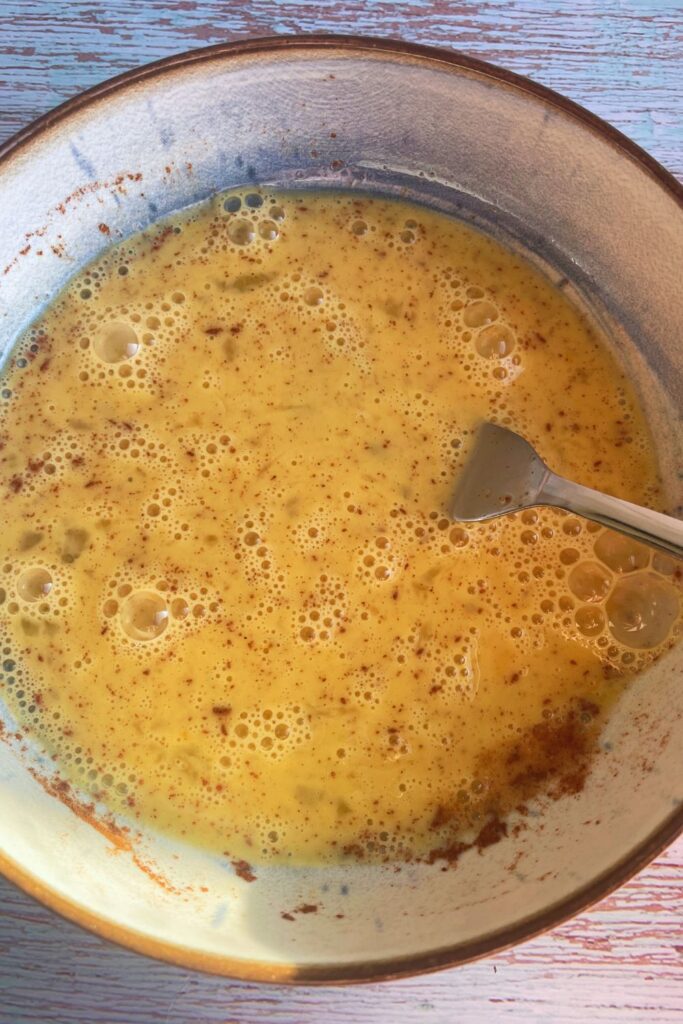
3. Make the Custard Mixture
In a shallow bowl, whisk together the eggs, milk, maple syrup and ground cinnamon. This will be the mixture that gives your French toast its rich, custardy texture.
4. Dip the Bread
Dip each Nutella-stuffed slice of bread into the custard mixture. Let the bread soak for a few seconds on each side to absorb the mixture. Be careful not to over-soak, as this can make the bread too soggy.
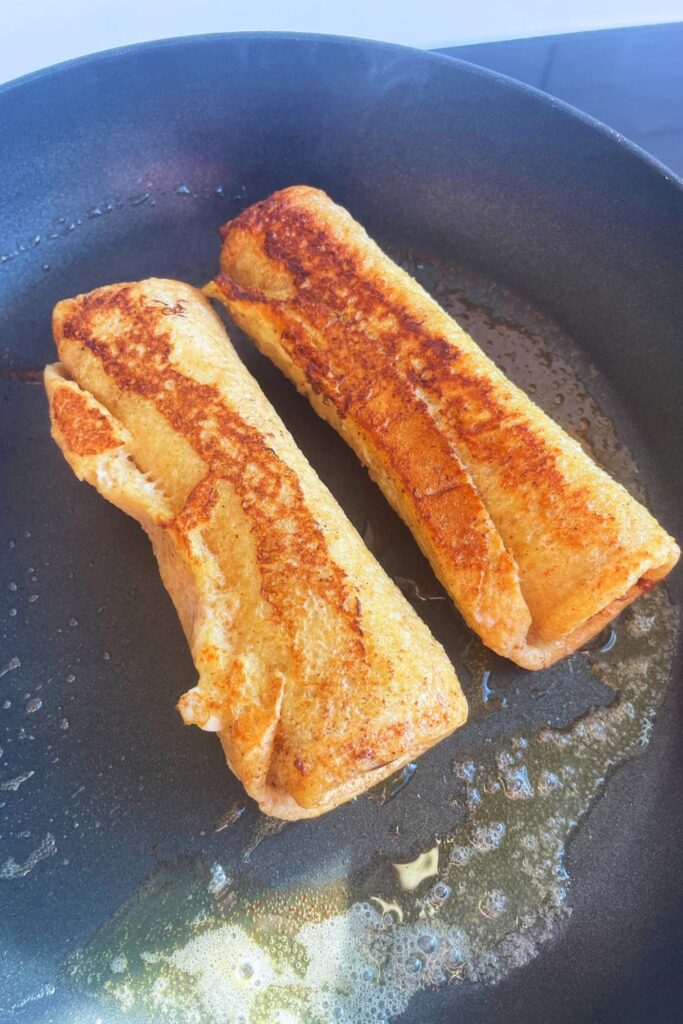
5. Fry to Perfection
Heat a large skillet or griddle over medium heat and add a pat of butter. Once the butter is melted and bubbling, place the soaked bread slices in the pan. Cook for about 2-3 minutes, or until the French toast is golden brown and crisp on the outside.
6. Serve and Enjoy
Transfer the Nutella stuffed French toast rolls to a serving plate. For an extra touch of indulgence, dust with powdered sugar and top with fresh berries.

Tips for the Perfect Nutella-Stuffed French Toast
- Choose the Right Bread: Thick slices of bread work best as they soak up the custard without falling apart.
- Don’t Skimp on the Nutella: Ensure each piece is generously filled to get that gooey, chocolatey center in every bite.
- Cook on Medium Heat: Cooking on medium heat ensures the French toast cooks through without burning the outside.
- Experiment with Toppings: Fresh fruit, whipped cream, nuts, or even a sprinkle of sea salt can elevate your French toast to new heights.
Nutella French Toast Rolls
Ingredients
- 3 slices Bread
- 1.3 Tbsp Nutella
- 1 Egg
- 4 Tbsp Milk
- 1 Tbsp Maple Syrup
- 1/2 tsp Cinnamon Powder
- 1 tsp Icing Sugar For Garnish
Instructions
- Using a rolling pin flatten bread slices.
- Put 1/2 Tbsp Nutella to each slice of bread on one corner.
- Roll to fond the bread slices.
- In a bowl beat Egg, Milk, Maple syrup and Cinnamon powder.
- Dip bread rolls in custard mixture and allow to soak the custard.
- In a pan add little butter and once it's heated, put bread rolls and cook until golden and crunchy on the outside.
- Take out and dust powder sugar on top for garnish.
If you like this delicious Nutella French Toast Rolls recipe, you might like my other recipes too. I would like to invite you to subscribe to my mailing list which is absolutely free. It will help you get updates on all my future posts. Next time when I post a similar recipe or something interesting you will get notified if you are on our mailing list. Thank you for checking my blog post.
Find My Other Recipes On My Recipe Page!
The post Nutella French Toast Rolls appeared first on Bubli's World Cuisine.
]]>The post 3 Ingredients Nutella Tarts In The Air Fryer appeared first on Bubli's World Cuisine.
]]>
3 ingredients nutella tarts in the Air fryer
Tarts are classic desserts and everyone loves them. But mini tarts are so adorable and makes so much sense. They are individual servings and makes the perfect bite sized dessert option for any party or gathering. If you’re a fan of Nutella, you’re in for a treat! Today, I’m sharing a recipe for a quick and easy 3 ingredients Nutella tarts that you can make right in your air fryer in just 5 minutes! These little sweet chocolatey bites are perfect for any occasion, whether it’s a family gathering, a party, or just a cozy night in. Let’s dive into this simple recipe.
What’s special about this Air Fryer Nutella Tart Dessert recipe
- It’s a 5 minutes dessert recipe when making in the air fryer.
- It requires only a 3 ingredients.
- They are adorable with choice of topping.
- Quick and Easy tasty little desserts.
- Perfect party food with minimal work.
What is a tart?
A tart is a type of baked dish that consists of a filling over a pastry base with an open top that is not covered with pastry. Here are some key characteristics and types of tarts:
- Pastry Base: The base is typically made from short crust pastry, which provides a crisp and firm texture that supports the filling. For this easy recipe I have used Sainsburys ready to use pre made tart shells.
- Filling: Tarts can be either sweet or savory. Common sweet fillings include fruits, custards, and chocolate. Savory tarts might be filled with ingredients such as cheese, vegetables, and meats.

My other Delicious Air Fryer recipes you might like:
Air Fryer Dehydrated Strawberry Chips
Recipe Video: 3 Ingredients Nutella Tarts In The Air Fryer
I have created a recipe video for making this 5 minutes Nutella tart desserts in the air fryer and have already posted the video on my YouTube channel Bubli’s World Cuisine. It’s a step by step visual demonstration on how to make this quick and easy bite sized party food at home for guests as well as family. To see the recipe in action from start to finish, please click on the video. And for a printable version of this recipe please check the recipe card at the end of the blog:
Why make nutella tarts in the air fryer?
- Quick Dessert On The Table: Weather you are making them for family or guests, they are ready in just 5 minutes!
- Only 3 Simple ingredients: All you need is 3 simple ingredients to make these delicious tarts! And the great thing about them is that you might already have the ingredients in your home.
- Can be altered to taste: The recipe does not require use of any additional sweetener but you can use them if you prefer.
To make this tasty easy Air fryer chocolate tart desserts, you’ll need the following ingredients:
- Nutella– The key ingredient for making these air fryer tarts.
- Philadelphia Cream Cheese – You can use any cream cheese for this.
- Egg Yolk – Make sure egg is at room temperature.
- Chopped Nuts – You can use any nut of your choice For garnish.
- Powder Sugar – Gives some sweetness to the tarts.
Steps to Make delicious Air Fryer Nutella Tarts Desserts:
- In a bowl take Nutella, Cream cheese, Egg yolk and whisk together to form the tart filling.
- Lay out tart shells and pour the mixture onto the shells.
- Garnish with some nuts on top.
- Put in the Air fryer @150° for just 5 minutes.

- Pro tip: Make ahead for party. Prepare the filling night before. On the day just pour and bake fresh.
- Pro tip: It’s important not to over bake them in the air fryer.
Storing Leftover Nutella Tarts
You can easily store leftover tarts in an air tight container. They should be fine in the refrigerator for 2-3 days when stored properly.


3 Ingredients Nutella Tarts In The Air Fryer
Ingredients
- 1 Tbsp Nutella
- 1 Tbsp Philadelphia Cream Cheese
- 1 Egg Yolk
- 1 tsp Chopped Nuts
- 1/2 tsp Powder Sugar
Instructions
- In a bowl take Nutella, Cream cheese, Egg yolk and whisk together to form the tart filling.
- Lay out tart shells and pour the mixture onto the shells.
- Garnish with some nuts on top.
- Put in the Air fryer @150° for just 5 minutes.
If you like this recipe, you might like my other recipes too. I would like to invite you to subscribe to my mailing list which is absolutely free. It will help you get updates on all my future posts. Next time when I post a similar recipe or something interesting you will get notified if you are on our mailing list. Thank you for checking my blog post.
Some Recipe Suggestions:

No-Bake Biscoff Cheesecake Desserts
French Toast Recipe
Dutch Baby Pancakes
Find My Other Recipes On My Recipe Page!
I love to read what viewers have to say about my recipes. If you have any comment, suggestions or any questions please put them on the comment box below. I check them on a regular basis and will surely come back to you. Thank you.
The post 3 Ingredients Nutella Tarts In The Air Fryer appeared first on Bubli's World Cuisine.
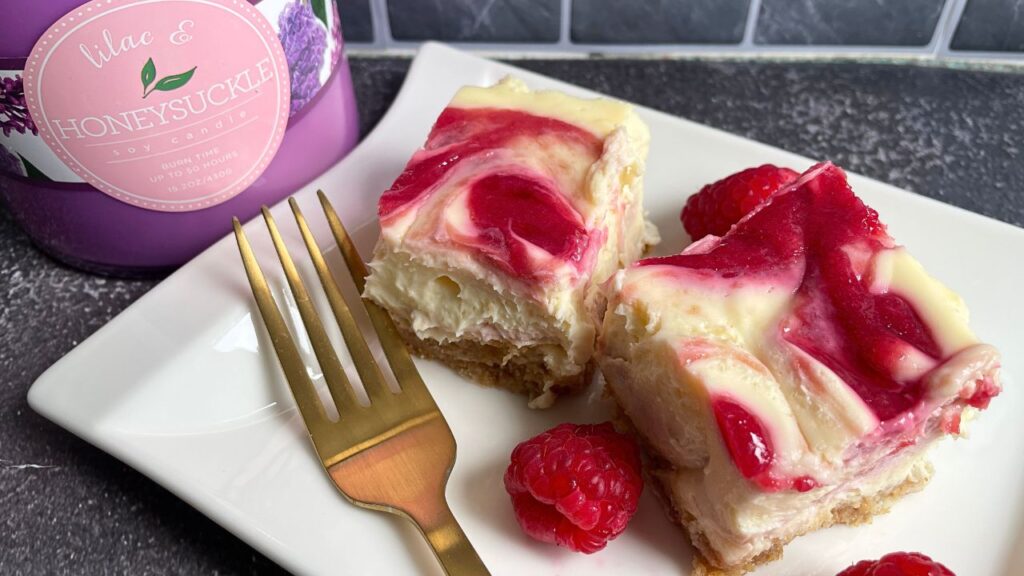
]]>The post White Chocolate Raspberry Cheesecake appeared first on Bubli's World Cuisine.
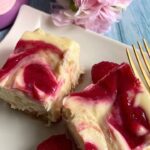
]]>This white chocolate raspberry cheesecake is a treat for dessert lovers. They are creamy and rich with just slightly tangy. It’s the perfect way for using summer berries.
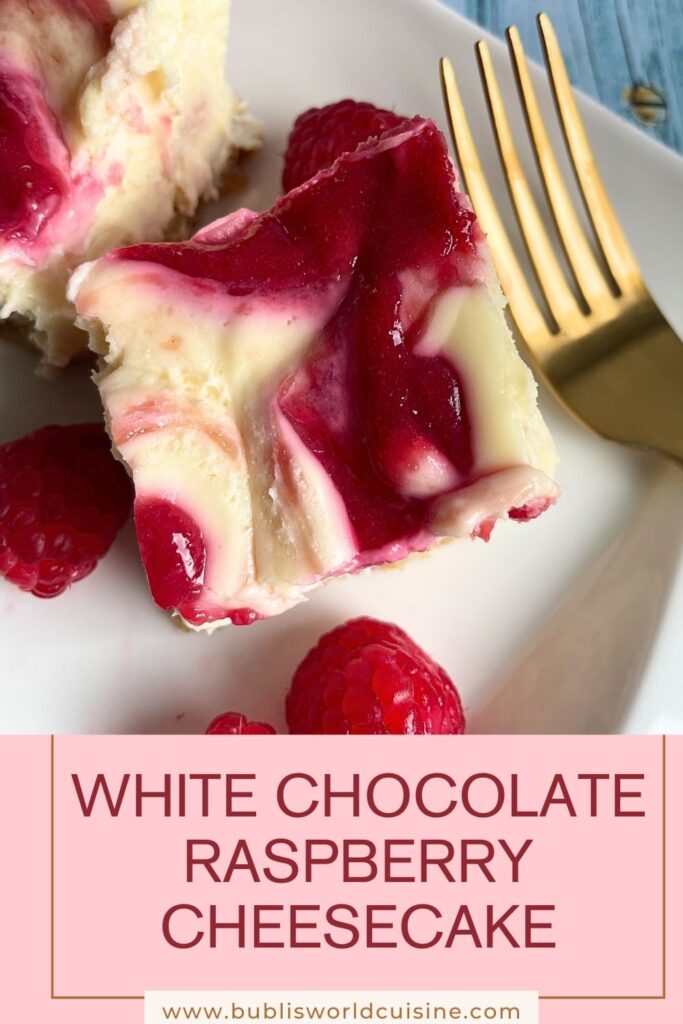
Cheesecakes are a delightful indulgence that brings joy to dessert enthusiasts. With their creamy texture and rich flavor, they offer a delectable treat. The combination of white chocolate and raspberries creates a perfect balance of sweetness and tanginess, making it an excellent choice for a cheesecake flavor. This dessert not only satisfies the taste buds but also serves as a fantastic addition to any party or gathering, especially during the summer season when fresh berries are abundant. Planning ahead and preparing this make-ahead dessert can alleviate some of the burdens for hosts, ensuring a stress-free and enjoyable experience for all.
Cheesecakes are delicious. They make such an amazing party dessert; works amazing as a summer dessert as well when berries are fresh. White chocolate and raspberries are a classic combination and works amazing for cheesecake. This make in advance dessert takes off some of the load for hosts when planned properly.
White chocolate raspberry cheesecake:
This is a full proof recipe for making delicious white chocolate raspberry cheesecake. If you follow this recipe step-by-step then your cheesecake should come out smooth every time. Starting from oven temperature to use of ingredients and measurement; everything is full proof.
My top tips for making the best Raspberry Cheesecake:
Make sure all refrigerated ingredients are are at room temperature.
Use quality ingredients for the best result.
Measure everything correctly.
Chill enough to set cheesecake and get proper texture and taste.
Take the cheesecake out from the oven while the center is still wobbly.
Can I Freeze Cheesecake:
Yes, cheesecakes can be frozen. Now that’s a relief because cheesecakes are dense and very filling. These deliciously creamy desserts lasts few days in the refrigerator anyways but sometimes there are leftovers from party or if the family is small and you have made a standard sized one. It’s nice to enjoy the rest later when you crave for having some homemade creamy cheesecake. At the same time it gives you the opportunity to impress your guests in a low-stress way by making the dessert beforehand.

My other Dessert recipes you might like:
Recipe Video: White Chocolate Raspberry Cheesecake
I have created a mini recipe video for making this flavorful white chocolate raspberry cheesecake dessert and have already posted the video on my YouTube channel Bubli’s World Cuisine. It’s a step by step visual demonstration on how to make Raspberry cheesecake from scratch at home. To see the recipe in action from start to finish, please click on the video. And for a printable version of this recipe please check the recipe card at the end of the blog:
Storage:
Cheesecake stays well in the refrigerator for at least few days when stored properly in an air-tight container. If you are planning to make it fresh from scratch then it ‘s essential to plan ahead as they need enough time in the refrigerator to chill properly. Just before serving take out from fridge and serve chill with or without fresh fruits on top.
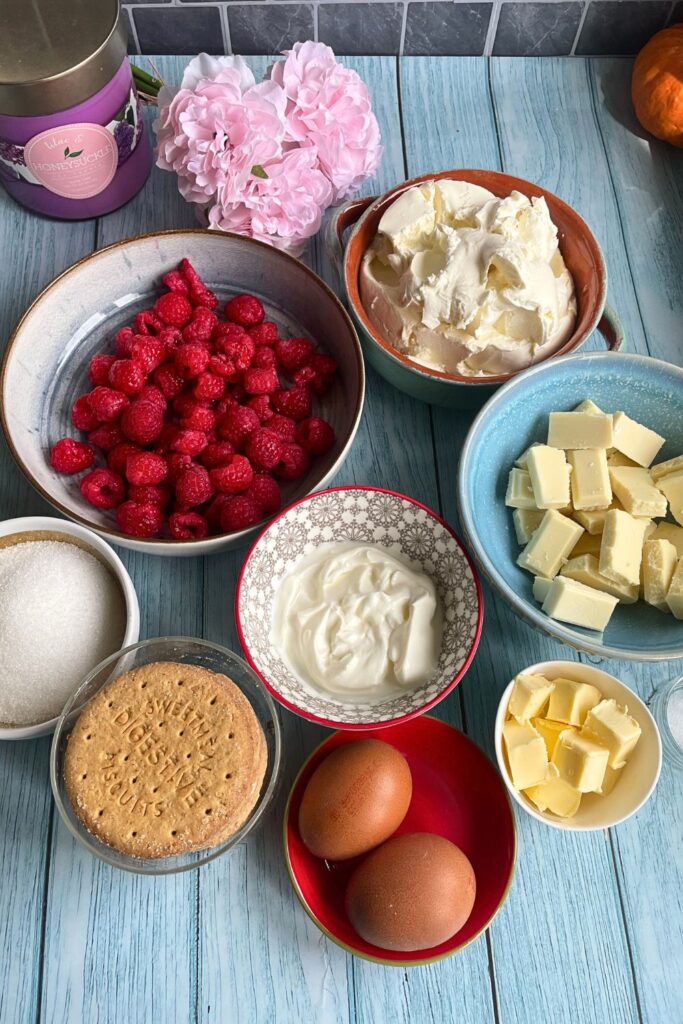
How To Make White Chocolate Raspberry Cheesecake From Scratch:
Ingredients List
Raspberry – Both fresh and frozen raspberries work well for this cheesecake recipe.
Egg – Make sure eggs are at room temperature.
Sugar – White granulated sugar works fine for this recipe.
Salt – Just a pinch of salt balances other ingredients in the recipe.
Vanilla – Always try to use good quality vanilla extract; that gives better flavor.
White Chocolate – Always use good quality white chocolate as it affects the final cheesecake. You can melt white chocolate in a double boiler or in the microwave as well.
Digestive Biscuits – You may also use graham crackers or shortbread biscuits for the base.
Butter – Use unsalted butter for this recipe.
Cream Cheese – Cream cheese is the key ingredient for this recipe. Make sure it’s at room temperature.
Greek Yogurt – Greek yoghurt gives slight tanginess to the cheesecake and also helps it stabilize.
Instructions
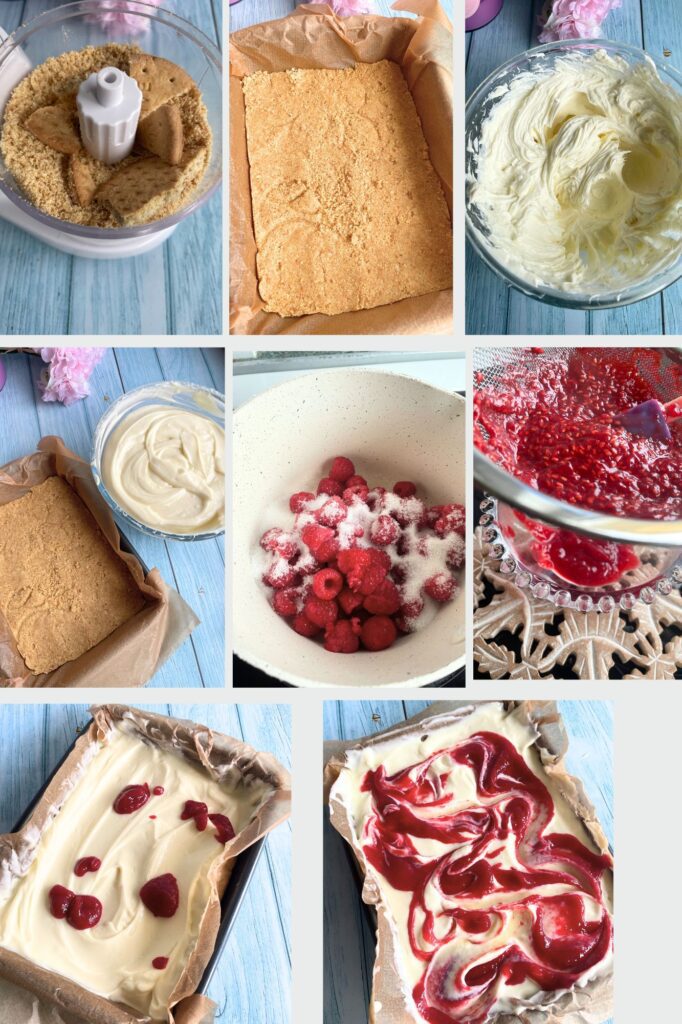
Put Digestive biscuits into grinder and crush them into fine crumbs. Add melted butter and grind again.
Line a baking dish with parchment paper and put biscuit crumbs on that. Press and flatten the surface and then set aside for later.
Put Raspberries and sugar in a pan and cook over medium heat. I like to squish them for quicker cooking. When water dries out it’s ready.
Sieve the sauce and set aside to cool down.
In a separate bowl beat together cream cheese and sugar for about 20-30 seconds. Add Eggs and Vanilla and beat again. Next put in melted white chocolate that has been cooled down and beat. Finally add in Greek yogurt and give a final mix.
Pour half of the cream cheese mixture on top of biscuit layer.
Add dollops of Raspberry sauce and create swirls using a toothpick or spoon.
Repeat it for the second layer of Cream cheese mixture and Raspberry sauce.
Bake in a 180 C pre heated oven for 25-30 minutes. The middle should be wobbly when taking out.
Let the cheesecake cool down completely and then refrigerate for 6-8 hours.
White Chocolate Raspberry Cheesecake
Ingredients
Biscuit Base
- 10 pc Digestive biscuits
- 3 Tbsp Melted Butter
Cheesecake Mixture
- 450 g Cream Cheese
- 1/3 Cup Sugar
- 2 Eggs
- 1 tsp Vanilla Extract
- 170 g Melted White Chocolate
- 1/3 Cup Greek Yogurt
- 1/2 tsp Salt
Raspberry sauce
- 1 & 1/2 Cups Raspberries Fresh or Frozen
- 3 Tbsp Granulated sugar
Instructions
- Put Digestive biscuits into grinder and crush them into fine crumbs. Add melted butter and grind again.
- Line a baking dish with parchment paper and put biscuit crumbs on that. Press and flatten the surface and then set aside for later.
- Put Raspberries and sugar in a pan and cook over medium heat. I like to squish them for quicker cooking. When water dries out it’s ready.
- Sieve the sauce and set aside to cool down.
- In a separate bowl beat together cream cheese and sugar for about 20-30 seconds. Add Eggs and Vanilla and beat again. Next put in melted white chocolate that has been cooled down and beat. Finally add in Greek yogurt and give a final mix.
- Pour half of the cream cheese mixture on top of biscuit layer.
- Add dollops of Raspberry sauce and create swirls using a toothpick or spoon.
- Repeat it for the second layer of Cream cheese mixture and Raspberry sauce.
- Bake in a 180 C pre heated oven for 25-30 minutes. The middle should be wobbly when taking out.
- Let the cheesecake cool down completely and then refrigerate for 6-8 hours.
FAQs
What Should I Serve With White Chocolate And Raspberry Cheesecake?
You really don’t need to add a thing to this delicious dessert, but if you’d like, it’s always fun to offer couple of spoons of that raspberry sauce or something light such as whipped cream, on the side.
How Do I Know My Cheesecake Is Done?
Cheesecakes are done when they are still wobbly from the center. It’s called the “wobble test”. I gently shake the pan to see if the center is slightly wobbling and that means they are perfectly done. But it should not be runny, but it should be barely set, with a bit of wiggle. Your cheesecake will most likely reach this point before it gets brown around the edges, but don’t be tempted to cook it any longer! It will firm up as it cools and rests in the refrigerator.
If you like this dessert recipe, you might like my other recipes too. I would like to invite you to subscribe to my mailing list which is absolutely free. It will help you get updates on all my future posts. Next time when I post a similar recipe or something interesting you will get notified if you are on our mailing list. Thank you for checking my blog post.
Some Recipe Suggestions:

Cucumber Canapes Party Appetizers
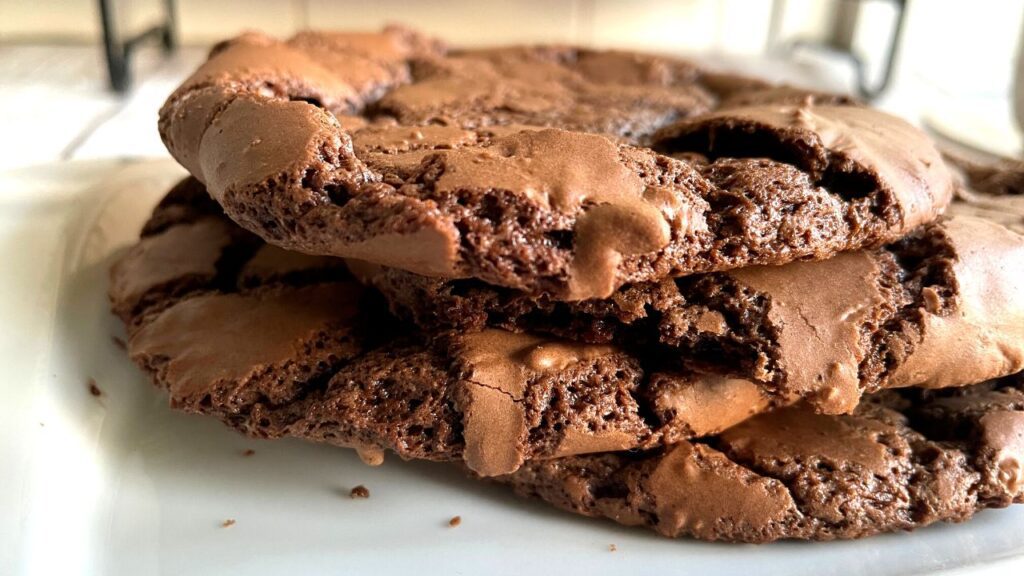
Fudge Brownie Cookies
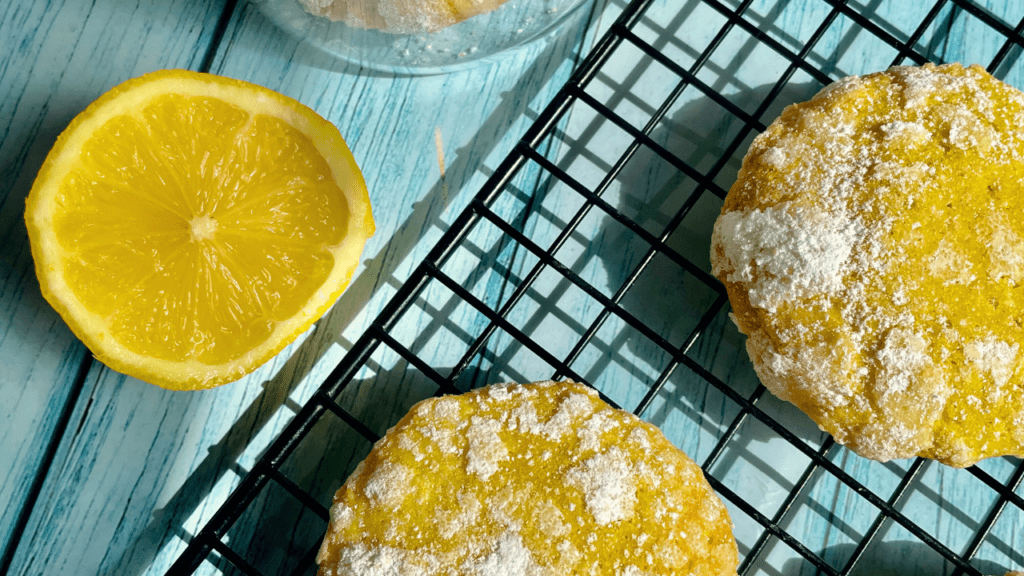
Lemon Crinkle Cookies
The post White Chocolate Raspberry Cheesecake appeared first on Bubli's World Cuisine.
]]>